Showing posts with label samsung. Show all posts
Showing posts with label samsung. Show all posts
Thursday, February 9, 2017
how to remove samsung s2 pattan lock Hard Reset
how to remove samsung s2 pattan lock Hard Reset
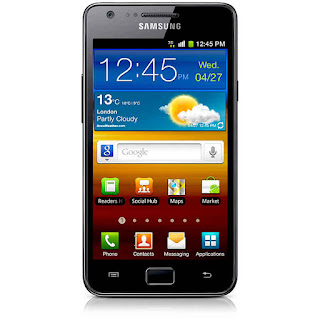
If You Forget Your samsung S2 Mobile Phone Patton lock You Can Easyly Remove This Lock. Step By Step
1. Turn off your Samsung S2 Mobile Phone.
2. Hold down the Volume Up, Power and Home (button center) buttons.
3. when Your Mobile Phone Start Show The Logo release all The Buttons.
4. Use The Volume Up and Down Button to Select wipe data/factory reset
5. Press The Home Button To Confirm wait Several minutes for data reset process to complete
6. Select reboot system now and wait Several minutes
Available link for download

Thursday, February 2, 2017
How is the haptic feedback Like a Samsung it like an lg
How is the haptic feedback Like a Samsung it like an lg
So I am looking at buying a Nextbit Robin but I have this weird issues about haptic feedback (keyboard vibration) my question is does it feel like a galaxy, Nexus 5x, Nexus 6p, HTC 10 type vibration or like a lg, oneplus, HTC m8 feel? Thanks..
Sent from my LG-H901 using Tapatalk
Sent from my LG-H901 using Tapatalk
from xda-developers http://ift.tt/2amk383
via IFTTT
Available link for download
Monday, January 2, 2017
How To Delete Google Verify Account Any Samsung Android Phones
How To Delete Google Verify Account Any Samsung Android Phones
How To Bypass Any Samsung Google Verify Account Software Solution Here For Free
a lot of user having this issue.
this is looks like
pls first look out this post those phone contain 5.0.0 or lower version.
this software just for update like 5.1.1 upper version work.
not only me .
this is tested over 100 person.
this day the software become a business
thats why i m here to share the paid software
Download Link
what you need?
1.my software
2.otg cable
3.same as same issue phone
note that the software unable to bypass samsung account.
dont ask me for that.it is just for bypass google verification.because i clear everything here.
how to use?
1.simple brain
2.put the file on pendrive
3.power on phone
4.connect the pendrive through otg cable
5.now you will see file manager
6.install the software
7.then you will automatic promoted to settings
8. make reset from settings
9.wait to restart phone
10.now setup as new phone
Available link for download
Monday, December 26, 2016
Free Download samsung s5603 Latest Flash File
Free Download samsung s5603 Latest Flash File

Flash File Size : 98MB
Download Flash File : HERE
Free Download Samsung Flash File If you Need Samsung S5603 Flash File Download This File. you Can Solve your Mobile Phone Auto Restart Problem Or Hang Problem. Any Function is not working problem. app is not work..
Available link for download
Sunday, December 25, 2016
Install Android 6 0 1 Marshmallow AICP 11 0 ROM on Verizon Samsung Galaxy S5 SM G900V
Install Android 6 0 1 Marshmallow AICP 11 0 ROM on Verizon Samsung Galaxy S5 SM G900V
According to XDA Member Beeko, Android 6.0.1 Marshmallow AICP 11.0 ROM is now released for Verizon Samsung Galaxy S5 SM- G900V [ kltevzw].

AICP is known by everyone as Ice Cold Project that started on Desire HD and since then evolved into a mature ROM with the BEST community you can find!!!
Until Lollipop, Rom has always been AOKP based. Unfortunately, since AOKP either stopped development or will make a comeback later this year, we changed our base to CM when it comes to hardware, drivers and some features.
If there are any bugs, either we will sort them or CM team if it concerns their modifications. This rom isnt CM supported so no need to report errors or bugs to them.
View my Flipboard Magazine.
÷ Prerequisites:
•This tutorial is only for installing Android 6.0.1 Marshmallow AICP 11.0 ROM on Verizon Samsung Galaxy S5 SM- G900V [ kltevzw] .Please do not try on any other Galaxy S5 Variants.
•Your phone should have a custom recovery installed in order to install this NanoROM ROM on your phone.
•We will be using TWRP Recovery for this tutorial.
•This tutorial will wipe out all your data. Make sure you backup all your data in your phone before proceeding.
•Samsung KIES will NOT detect your phone after installing this ROM because it is a custom firmware
•Perform a Dalvik Cache wipe before proceeding from the Recovery Mode.
*Disclaimer:
Android Custom ROM fix ® provide various Firmware Updates and Rooting process along with Custom ROM,Modes,file are all belong to their owners/developers. The autor of this site or the developers are not responsible, if you damage or brick your device.Do it on your own risk and follow the instruction properly.
* Important:
Backup important files stored on your device before proceeding with the steps below, so that in case something goes wrong you’ll have backup of all your important files.

You can find out how to apply it right now via XDA.
For More Samsung Galaxy Note 5 Updates Keep Checking Android custom ROM Fix ™®
That’s all. We hope this guide serves you well. If there’s anything you’d like to be added/changed on this page, PLZ Use the comment box below to contribute more ideas & Suggestions .
Like this post? PLZ Hit the share buttons below to share this article with your friends on Facebook, Google + and Twitter.
Want the latest Updates Sign up for our newsletters!
PLZ Follow Us On Flipboard 4 More Latest Updates.
Best Regards.™
÷ Prerequisites:
•This tutorial is only for installing Android 6.0.1 Marshmallow AICP 11.0 ROM on Verizon Samsung Galaxy S5 SM- G900V [ kltevzw] .Please do not try on any other Galaxy S5 Variants.
•Your phone should have a custom recovery installed in order to install this NanoROM ROM on your phone.
•We will be using TWRP Recovery for this tutorial.
•This tutorial will wipe out all your data. Make sure you backup all your data in your phone before proceeding.
•Samsung KIES will NOT detect your phone after installing this ROM because it is a custom firmware
•Perform a Dalvik Cache wipe before proceeding from the Recovery Mode.
*Disclaimer:
Android Custom ROM fix ® provide various Firmware Updates and Rooting process along with Custom ROM,Modes,file are all belong to their owners/developers. The autor of this site or the developers are not responsible, if you damage or brick your device.Do it on your own risk and follow the instruction properly.
* Important:
Backup important files stored on your device before proceeding with the steps below, so that in case something goes wrong you’ll have backup of all your important files.
You can find out how to apply it right now via XDA.
For More Samsung Galaxy Note 5 Updates Keep Checking Android custom ROM Fix ™®
That’s all. We hope this guide serves you well. If there’s anything you’d like to be added/changed on this page, PLZ Use the comment box below to contribute more ideas & Suggestions .
Like this post? PLZ Hit the share buttons below to share this article with your friends on Facebook, Google + and Twitter.
Want the latest Updates Sign up for our newsletters!
PLZ Follow Us On Flipboard 4 More Latest Updates.
Best Regards.™
Available link for download
Thursday, December 8, 2016
Download Free Samsung Galaxy S6 SM g920T Stock ROM Firmware Flash File
Download Free Samsung Galaxy S6 SM g920T Stock ROM Firmware Flash File

Download Free For you. if your samsung galaxy s6 smart phone is slowly working. phone is not working properly you need upgrade or reinstall your device firmware. you can download this latest stock rom on my site.
Download Now
Available link for download
Wednesday, December 7, 2016
Bricked Samsung GT S7560 after trying to install recovery
Bricked Samsung GT S7560 after trying to install recovery
I had already rooted it and was going to perform a ROM backup and during the install of the recovery the phone froze (for about 15 mins) so I unplugged the battery & charger and It went fully dead, no boot animation or pc recognition whatsoever. I was going to install TWRP recovery to backup and make my own ROM to see if I can get any decent life into it. This phone Is nothing special to me since I bought an iPhone 5c 3 years ago instead because I couldnt bare to look at how horrendously bad this samsung phone is.
from xda-developers http://ift.tt/2a5vz6L
via IFTTT
Available link for download
Sunday, December 4, 2016
Boot loop Samsung Galaxy S6 G920P
Boot loop Samsung Galaxy S6 G920P
Hello everyone,
So I am very new to the concepts of rooting and custom roms, and I know I should have done some more research before I started. But now I have gotten myself into a bit of a pickle. I have the SM-G920P (Sprint) S6 and earlier this week I managed to root the phone and use TWRP to download and flash a custom rom. I used MD5: 7c1d34f7ab066104c924fb7a960b57d0 to install Renegade and then the phone booted just fine. I made the mistake afterwords when I let the phone reboot, but I had not turned on the option for OEM so now my phone is stuck in a boot that gives me a FRM lock because of the custom binary. It will not let me get into the andriod recovery (volume up, home, and power) but I can get to the download mode. I cannot seem to get any firmware to flash onto the device because I always get a fail after NAND write. Any help or direction from here would be great, Thanks.
So I am very new to the concepts of rooting and custom roms, and I know I should have done some more research before I started. But now I have gotten myself into a bit of a pickle. I have the SM-G920P (Sprint) S6 and earlier this week I managed to root the phone and use TWRP to download and flash a custom rom. I used MD5: 7c1d34f7ab066104c924fb7a960b57d0 to install Renegade and then the phone booted just fine. I made the mistake afterwords when I let the phone reboot, but I had not turned on the option for OEM so now my phone is stuck in a boot that gives me a FRM lock because of the custom binary. It will not let me get into the andriod recovery (volume up, home, and power) but I can get to the download mode. I cannot seem to get any firmware to flash onto the device because I always get a fail after NAND write. Any help or direction from here would be great, Thanks.
from xda-developers http://ift.tt/2aEHtEs
via IFTTT
Available link for download
Thursday, November 24, 2016
How Root Samsung Galaxy J7 J5 J3 on Marshmallow 6 0 1 Update
How Root Samsung Galaxy J7 J5 J3 on Marshmallow 6 0 1 Update
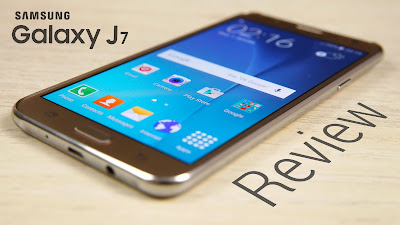
Now that Marshmallow update is available for the Galaxy J7, J5 and J3, you might want to know how to get root on the newer firmware versions before installing the update.
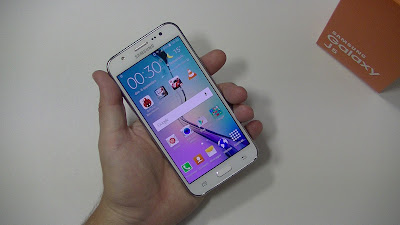
Thankfully, the latest SuperSU zip with systemless root works for Marshmallow releases by Samsung. So, to get root on your J series devices, all you gotta do is get a custom recovery like TWRP installed and then flash the SuperSU zip to get root access.
You can find out how to apply it right now via this easy tutorial .
View my Flipboard Magazine.
÷ Prerequisites:
This tutorial is only for root Samsung Galaxy J7/J5 /J3 on Marshmallow 6.0.1 Update.
*Disclaimer:
Android Custom ROM fix ® provide various Firmware Updates and Rooting process along with Custom ROM,Modes,file are all belong to their owners/developers. The autor of this site or the developers are not responsible, if you damage or brick your device.Do it on your own risk and follow the instruction properly.
* Important:
Backup important files stored on your device before proceeding with the steps below, so that in case something goes wrong you’ll have backup of all your important files.
÷ How Root Samsung Galaxy J7/J5 /J3 on Marshmallow 6.0 Update
1- Download TWRP recovery ,SuperSU v2.65 and Odin 3.10.6 for your device.
2- Unzip the Odin 3.10.6 .zip file and run/open Odin3 v3.10.6.exe file from the extracted files on your PC.
3- Make sure you’ve downloaded a Odin flashable TWRP recovery .tar file compatible for your device.
(If applicable) Enable OEM unlock:
Go to Settings » About phone » and tap “Build number” seven times to enable “Developer options”.
4- Go back to main Settings page, scroll to bottom and select “Developer options” from there.
5- Under Developer options, look for “Enable OEM unlock” checkbox/toggle and make sure you Check it or turn it ON.
6- Boot your device into Download mode:
Switch off your device.
7- Press and hold “Home + Power + Volume down” buttons for a few seconds until you see a warning screen.
8- Press Volume Up on the warning screen to accept it and boot into Download mode.
9- Once your device is in download mode, connect it to the PC with a USB cable. The Odin window on PC should detect the device and show an “Added!!” message.
10- Now click on the AP tab on Odin window and select the TWRP recovery .tar file that you downloaded for your device.
? Note: DON’T play with any other options on the screen. You’re only required to connect your device and select the TWRP recovery .tar file in the AP tab.
11- Click the Start button on Odin and wait for it to finish the process. Once it has finished successfully, you’ll see a pass message on the Odin screen.
Your device will automatically reboot when Odin is done flashing. You can then disconnect your device.
12- Now transfer the SuperSU zip file from the download link above to your device’s storage.
13- Boot your device into TWRP recovery.
Tap on “Install” and select the SuperSU zip file that you transferred to your device in Step 1.
14-After selecting the .zip file, do “Swipe to Confirm Flash” on the bottom of screen to begin the flashing process.
15- Once SuperSU is flashed, you’ll get “Reboot System” option, select it.
Congratulations! Your device should be rooted now. Look for the SuperSU app in app drawer.
For More Samsung Galaxy phones Updates Keep Checking Android Custom ROM Fix ™©
That’s all. We hope this guide serves you well. If there’s anything you’d like to be added/changed on this page, PLZ Use the comment box below to contribute more ideas & Suggestions .
Like this post? PLZ Hit the share buttons below to share this article with your friends on Facebook, Google + and Twitter.
Want the latest Updates Sign up for our newsletters!
PLZ Follow Us On Flipboard 4 More Latest Updates.
Best Regards.™
÷ Prerequisites:
This tutorial is only for root Samsung Galaxy J7/J5 /J3 on Marshmallow 6.0.1 Update.
*Disclaimer:
Android Custom ROM fix ® provide various Firmware Updates and Rooting process along with Custom ROM,Modes,file are all belong to their owners/developers. The autor of this site or the developers are not responsible, if you damage or brick your device.Do it on your own risk and follow the instruction properly.
* Important:
Backup important files stored on your device before proceeding with the steps below, so that in case something goes wrong you’ll have backup of all your important files.
÷ How Root Samsung Galaxy J7/J5 /J3 on Marshmallow 6.0 Update
1- Download TWRP recovery ,SuperSU v2.65 and Odin 3.10.6 for your device.
2- Unzip the Odin 3.10.6 .zip file and run/open Odin3 v3.10.6.exe file from the extracted files on your PC.
3- Make sure you’ve downloaded a Odin flashable TWRP recovery .tar file compatible for your device.
(If applicable) Enable OEM unlock:
Go to Settings » About phone » and tap “Build number” seven times to enable “Developer options”.
4- Go back to main Settings page, scroll to bottom and select “Developer options” from there.
5- Under Developer options, look for “Enable OEM unlock” checkbox/toggle and make sure you Check it or turn it ON.
6- Boot your device into Download mode:
Switch off your device.
7- Press and hold “Home + Power + Volume down” buttons for a few seconds until you see a warning screen.
8- Press Volume Up on the warning screen to accept it and boot into Download mode.
9- Once your device is in download mode, connect it to the PC with a USB cable. The Odin window on PC should detect the device and show an “Added!!” message.
10- Now click on the AP tab on Odin window and select the TWRP recovery .tar file that you downloaded for your device.
? Note: DON’T play with any other options on the screen. You’re only required to connect your device and select the TWRP recovery .tar file in the AP tab.
11- Click the Start button on Odin and wait for it to finish the process. Once it has finished successfully, you’ll see a pass message on the Odin screen.
Your device will automatically reboot when Odin is done flashing. You can then disconnect your device.
12- Now transfer the SuperSU zip file from the download link above to your device’s storage.
13- Boot your device into TWRP recovery.
Tap on “Install” and select the SuperSU zip file that you transferred to your device in Step 1.
14-After selecting the .zip file, do “Swipe to Confirm Flash” on the bottom of screen to begin the flashing process.
15- Once SuperSU is flashed, you’ll get “Reboot System” option, select it.
Congratulations! Your device should be rooted now. Look for the SuperSU app in app drawer.
For More Samsung Galaxy phones Updates Keep Checking Android Custom ROM Fix ™©
That’s all. We hope this guide serves you well. If there’s anything you’d like to be added/changed on this page, PLZ Use the comment box below to contribute more ideas & Suggestions .
Like this post? PLZ Hit the share buttons below to share this article with your friends on Facebook, Google + and Twitter.
Want the latest Updates Sign up for our newsletters!
PLZ Follow Us On Flipboard 4 More Latest Updates.
Best Regards.™
Available link for download
Friday, November 11, 2016
Direct Download Latest Samsung Galaxy S Duos 2 GT S7582 Flash Files
Direct Download Latest Samsung Galaxy S Duos 2 GT S7582 Flash Files

S7582XXUANA3_OJVANB1_LYS_United Arab Emirates_4.2.2.zip - 689.3 MB
S7582XXUANA3_OJVANB1_XSG_United Arab Emirates_4.2.2.zip - 689.3 MB
S7582XXUANA3_OLBANA1_Southeast_Asia_4.2.2.zip - 688.0 MB
S7582XXUANC2_OLBANB1_Southeast_Asia_4.2.2.zip - 665.8 MB
Available link for download
Wednesday, November 9, 2016
Hilfe Flash Rom Samsung Galaxy S6 SM G925F fehlgeschlagen
Hilfe Flash Rom Samsung Galaxy S6 SM G925F fehlgeschlagen
Guten Abend die Damen und Herren
Leider kam ich heute ohne grosse Erfahrung Betreff ROM Flash auf die Idee mein Samsung Galaxy S6 Edge Marshmallow auf ein bestimmtes Rom zu flashen damit XPose auf x64 Geräten läuft aber nun startet es nicht mehr und frierft beim Erscheinungsbild "Samsung Galaxy S6 edge" ein. Ich komme nur in den Odins-Modus und der Computer erkennt das Handy, aber nun komm ich nicht mehr weiter. Wie bring ich nun das handy wieder zu laufen, das ist nun mein einziges Ziel, danach mach ich nicht mehr am Gerät selber ^^. Ist mir dann eine Lehre, sonst muss ich morgen ein neues kaufen gehen aber hoffe das mir jemand weiterhelfen kann ahbe nicht so viel geld für ein neues-.- ....;):rolleyes:;)
Herzlichen Dank und besten Dank
leejanf8840
Leider kam ich heute ohne grosse Erfahrung Betreff ROM Flash auf die Idee mein Samsung Galaxy S6 Edge Marshmallow auf ein bestimmtes Rom zu flashen damit XPose auf x64 Geräten läuft aber nun startet es nicht mehr und frierft beim Erscheinungsbild "Samsung Galaxy S6 edge" ein. Ich komme nur in den Odins-Modus und der Computer erkennt das Handy, aber nun komm ich nicht mehr weiter. Wie bring ich nun das handy wieder zu laufen, das ist nun mein einziges Ziel, danach mach ich nicht mehr am Gerät selber ^^. Ist mir dann eine Lehre, sonst muss ich morgen ein neues kaufen gehen aber hoffe das mir jemand weiterhelfen kann ahbe nicht so viel geld für ein neues-.- ....;):rolleyes:;)
Herzlichen Dank und besten Dank
leejanf8840
from xda-developers http://ift.tt/2a36Pfb
via IFTTT
Available link for download
Sunday, November 6, 2016
Completely Reset Samsung Tab A 9 7 SM T350
Completely Reset Samsung Tab A 9 7 SM T350
I was messing around with trying to root my tablet and I seem to have gotten in a state I have not been able to figure out how to recover from. Starting the device now just opens the recovery screen with the message (at the bottom of the screen): "E: failed to mount /system (Invalid argument)" Factory reset doesnt work and I have tried using odin to flash the stock recovery for my device listed at http://ift.tt/1VlZ8Fc
I have been trying to find the stock firmware from other sites, but I have been unable to find a download link that isnt throttled (as in it takes less than 9 hours to download). I will try one of those site tonight, but I thought I would try asking about it here first. Let me know if I need to provide any other information.
I have been trying to find the stock firmware from other sites, but I have been unable to find a download link that isnt throttled (as in it takes less than 9 hours to download). I will try one of those site tonight, but I thought I would try asking about it here first. Let me know if I need to provide any other information.
from xda-developers http://ift.tt/2asPqjL
via IFTTT
Available link for download
Saturday, November 5, 2016
Free Latest samsung s7262 flash file Download
Free Latest samsung s7262 flash file Download

if your phone is working slowly or hang problem or dead problem flash your device use this flash file you can solve your problem.
Flash file Size : 427 MB

Available link for download
Sunday, October 9, 2016
How To Samsung gt s5360 insert sim problem Solution
How To Samsung gt s5360 insert sim problem Solution

Follow This Image You Can Solve Your Device Samsung Gt-s5360 insert sim. Check this green mark component use your avo miter if you find any component is short/ dead just replace it. also check this red color, green and blue color line if you find any line is broke re shouldering this line use copier coil. i hope you can solve your device problem. thank you.
Available link for download
Monday, October 3, 2016
Clone Android Samsung S7562 MTK6575 Flash File Download
Clone Android Samsung S7562 MTK6575 Flash File Download
Clone China Samsung S7562 latest flash file download directly for free without waiting longer. This is the latest version firmware Room setup available i.e Samsung S7562 (MTK6575). It is tested as well as good and working software setup

samsung s7562 mtk6575 latest official firmware
ur mobile was pettern lock
if u format by any box
now ur mobile hang on logo
dont worry
just flash with this firmware 1000% tested
i problem face of this model
set hang on logo after format by volcano
i flash by 4 firmware but set not ok
then i modify this firmware & flash
i successed 100%
firmware link=S7562 china mt6575 100%ok - Download
Flashing Guide=Downloads - Download
ur mobile was pettern lock
if u format by any box
now ur mobile hang on logo
dont worry
just flash with this firmware 1000% tested
i problem face of this model
set hang on logo after format by volcano
i flash by 4 firmware but set not ok
then i modify this firmware & flash
i successed 100%
firmware link=S7562 china mt6575 100%ok - Download
Flashing Guide=Downloads - Download
=========================================================
if ur phone pettern lock no need full flash
just Follow step by step without any problem
many set tested by me
very easy way
download this file=S7562 china mt6575 pettern lock - Download
driver=mtk driver - Download
open sp tool select scatter file double click recovery & select recovery file
click download & connect usb to ur phone
wait for download ok
after complete download disconnect usb & baattery reconnect
press & hold volume up + power key show recovery mode
just format & enjoy
just Follow step by step without any problem
many set tested by me
very easy way
download this file=S7562 china mt6575 pettern lock - Download
driver=mtk driver - Download
open sp tool select scatter file double click recovery & select recovery file
click download & connect usb to ur phone
wait for download ok
after complete download disconnect usb & baattery reconnect
press & hold volume up + power key show recovery mode
just format & enjoy
====================================================
Caution: Flashing and formatting of cell phone deleted all data like images, ringtones, music, contact numbers, etc. So it is important to take a backup of the data before flashing. Always use an upper or the same version while flashing Android mobile phones. Also keep in mind that downgrading the firmware version can create problems. So its better to use the same version or a later version.
Available link for download
Friday, September 30, 2016
More Samsung Galaxy Note 7 renders leak ahead of August 2 announcement
More Samsung Galaxy Note 7 renders leak ahead of August 2 announcement

As we inch closer to the Galaxy Note 7’s official debut, the leaks surrounding Samsung’s next flagship continue to pile up, and today there’s another to add to the pile.
Samsung

from PhoneDog.com - Latest videos, reviews, articles, news and posts http://ift.tt/2a0SZbl
via IFTTT
Available link for download
Monday, September 12, 2016
Cómo Intermitente Rom Samsung Galaxy Ace 2 GT I8160
Cómo Intermitente Rom Samsung Galaxy Ace 2 GT I8160

Completo tutorial para flashear Samsung Galaxy Ace 2 GT-I8160 con el software Odin, y les dejo los Firmwares originales para todas las regiones del mundo. Odin puede ser utilizado para instalar ROMs o firmwares en los dispositivos Samsung Galaxy Ace 2 I8160 también se puede utilizar para obtener acceso root, flashear recoverys, flashear ROMs modificadas, hacer particiones e instalar kernels. En nuestros tutoriales solemos utilizar este software para realizar muchos procedimientos, como son el flasheo de una ROM, la instalación de un nuevo Recovery etc.
- ARCHIVOS NECESARIOS :
- Controlador USB [DESCARGAR] o Kies [DESCARGAR]
- Odin v3 [DESCARGAR]
- Rom, Firmware Samsung Galaxy Ace 2 GT-I8160 [DESCARGAR]
- Bateria por lo menos al 50%
- PASOS A SEGUIR :
- Instale el controlador USB de Samsung o Kies en su ordenador
- Extraer el firmware Samsung Galaxy con rar victoria para encontrar el archivo .md5
- Apagar el celular
- Pasos a seguir (Download mode). Tener el dispositivo completamente apagado Mantener presionado durante 5 segundo Volumen Abajo + Home + Power Aparecerá un mensaje de Warning (pero no se alarmen), presionar Volumen Arriba para ingresar a Download Mode, con Volumen Abajo el Samsung Galaxy Ace 2 I8160 booteará normal
- Abrir Odin (el que descargaron arriba)
- Ver que la opción Re-Partition NO esté seleccionada
- Conectar por cable USB el Samsung Galaxy Ace 2 GT-I8160 a la computadora, Odin debe reconocer al dispositivo, nos daremos cuenta porque abajo de donde dice ID:CON aparecerá el cuadro sombreado de amarillo.
- Click en el botón PDA y seleccionar PDA_XXXXX.md5
- Ver que la opción Re-Partition NO esté seleccionada
- Click en Start
- Esperar a que salga PASS en fondo verde en Odin
- Listo!
Si por algún motivo se te queda booteando en el logo de Samsung, apaga el celular, reinicia en Recovery Mode Samsung Galaxy Ace 2 GT-I8160 y realiza un wipe data y wipe cache.
Tutorial: Qué es y cómo usar Odin
Available link for download
Friday, September 9, 2016
How to Root T Mobile Samsung Galaxy On5 G550T T1
How to Root T Mobile Samsung Galaxy On5 G550T T1
Official TWRP Recovery Now Available for the T-Mobile On5, you can get the device rooted easily by flashing latest SuperSU zip via the recovery’s install menu.

Thanks to jcadduono over at xda though, for bringing the under development build of TWRP for T-Mobile Galaxy On5 G550T which (apparently) works absolutely fine on the device.
Grab the T-Mobile Galaxy On5 TWRP recovery 3.0.2-0 build from the download link below and follow the quick instructions to flash the recovery using Odin and get root with SuperSU zip.
View my Flipboard Magazine.
÷ Prerequisites:
This Tutorial is only for T-Mobile Samsung Galaxy On5 G550T/T1.
*Disclaimer:
Android Custom ROM fix ® provide various Firmware Updates and Rooting process along with Custom ROM,Modes,file are all belong to their owners/developers. The autor of this site or the developers are not responsible, if you damage or brick your device.Do it on your own risk and follow the instruction properly.
* Important:
Backup important files stored on your device before proceeding with the steps below, so that in case something goes wrong you’ll have backup of all your important files.

How to Root T-Mobile Samsung Galaxy On5 G550T/T1:
1- Download T-Mobile Galaxy On5 TWRP 3.0.2-0 , Odin 3.10.7 and SuperSu v2.76 (stable, latest)
2- Unzip the Odin 3.10.7 .zip file and run/open Odin3 v3.10.6.exe file from the extracted files on your PC.
3- (If applicable) Enable OEM unlock:
Go to Settings » About phone » and tap “Build number” seven times to enable “Developer options”.
4- Go back to main Settings page, scroll to bottom and select “Developer options” from there.
5- Under Developer options, look for “Enable OEM unlock” checkbox/toggle and make sure you Check it or turn it ON.
6- Boot your device into Download mode:
Switch off your device.
Press and hold “Home + Power + Volume down” buttons for a few seconds until you see a warning screen.
7- Press Volume Up on the warning screen to accept it and boot into Download mode.
8- Once your device is in download mode, connect it to the PC with a USB cable. The Odin window on PC should detect the device and show an “Added!!” message.
9- Now click on the AP tab on Odin window and select the TWRP recovery .tar file that you downloaded for your device.
? Note: DON’T play with any other options on the screen. You’re only required to connect your device and select the TWRP recovery .tar file in the AP tab.
10- Click the Start button on Odin and wait for it to finish the process. Once it has finished successfully, you’ll see a pass message on the Odin screen.
11-Your device will automatically reboot when Odin is done flashing. You can then disconnect your device.
12- Transfer the SuperSU zip file from the download link above to your device’s storage.
13- Now Boot into TWRP recovery and take a full backup (optional) from the recovery options.
14- Tap on “Install” and select the SuperSU zip file that you transferred to your device in Step 1.
15- After selecting the .zip file, do “Swipe to Confirm Flash” on the bottom of screen to begin the flashing process.
16- Once SuperSU is flashed, you’ll get “Reboot System” option, select it.

Congratulations! Your device should be rooted now. Look for the SuperSU app in app drawer.
For More Samsung Galaxy On5 G550T/T1 Keep Checking Android Custom ROM Fix ™®
That’s all. We hope this guide serves you well. If there’s anything you’d like to be added/changed on this page, PLZ Use the comment box below to contribute more ideas & Suggestions .
Like this post? PLZ Hit the share buttons below to share this article with your friends on Facebook, Google + and Twitter.
Want the latest Updates Sign up for our newsletters!
PLZ Follow Us On Flipboard 4 More Latest Updates.
Best Regards.™
÷ Prerequisites:
This Tutorial is only for T-Mobile Samsung Galaxy On5 G550T/T1.
*Disclaimer:
Android Custom ROM fix ® provide various Firmware Updates and Rooting process along with Custom ROM,Modes,file are all belong to their owners/developers. The autor of this site or the developers are not responsible, if you damage or brick your device.Do it on your own risk and follow the instruction properly.
* Important:
Backup important files stored on your device before proceeding with the steps below, so that in case something goes wrong you’ll have backup of all your important files.
How to Root T-Mobile Samsung Galaxy On5 G550T/T1:
1- Download T-Mobile Galaxy On5 TWRP 3.0.2-0 , Odin 3.10.7 and SuperSu v2.76 (stable, latest)
2- Unzip the Odin 3.10.7 .zip file and run/open Odin3 v3.10.6.exe file from the extracted files on your PC.
3- (If applicable) Enable OEM unlock:
Go to Settings » About phone » and tap “Build number” seven times to enable “Developer options”.
4- Go back to main Settings page, scroll to bottom and select “Developer options” from there.
5- Under Developer options, look for “Enable OEM unlock” checkbox/toggle and make sure you Check it or turn it ON.
6- Boot your device into Download mode:
Switch off your device.
Press and hold “Home + Power + Volume down” buttons for a few seconds until you see a warning screen.
7- Press Volume Up on the warning screen to accept it and boot into Download mode.
8- Once your device is in download mode, connect it to the PC with a USB cable. The Odin window on PC should detect the device and show an “Added!!” message.
9- Now click on the AP tab on Odin window and select the TWRP recovery .tar file that you downloaded for your device.
? Note: DON’T play with any other options on the screen. You’re only required to connect your device and select the TWRP recovery .tar file in the AP tab.
10- Click the Start button on Odin and wait for it to finish the process. Once it has finished successfully, you’ll see a pass message on the Odin screen.
11-Your device will automatically reboot when Odin is done flashing. You can then disconnect your device.
12- Transfer the SuperSU zip file from the download link above to your device’s storage.
13- Now Boot into TWRP recovery and take a full backup (optional) from the recovery options.
14- Tap on “Install” and select the SuperSU zip file that you transferred to your device in Step 1.
15- After selecting the .zip file, do “Swipe to Confirm Flash” on the bottom of screen to begin the flashing process.
16- Once SuperSU is flashed, you’ll get “Reboot System” option, select it.
Congratulations! Your device should be rooted now. Look for the SuperSU app in app drawer.
For More Samsung Galaxy On5 G550T/T1 Keep Checking Android Custom ROM Fix ™®
That’s all. We hope this guide serves you well. If there’s anything you’d like to be added/changed on this page, PLZ Use the comment box below to contribute more ideas & Suggestions .
Like this post? PLZ Hit the share buttons below to share this article with your friends on Facebook, Google + and Twitter.
Want the latest Updates Sign up for our newsletters!
PLZ Follow Us On Flipboard 4 More Latest Updates.
Best Regards.™
Available link for download
Friday, September 2, 2016
How to Root Samsung Galaxy J5 TWRP on Marshmallow 6 0 1 Update
How to Root Samsung Galaxy J5 TWRP on Marshmallow 6 0 1 Update
Thanks to Developer "ganesh varma" over at xda, a new version of TWRP recovery is already available for the Galaxy J5 running on Marshmallow 6.0.1 PG2 firmware and so you can root your Samsung Galaxy J5 (J500H) on latest Marshmallow 6.0 update with software build PG2 Easily.

The new TWRP recovery is reportedly working fine for the Galaxy J5 on Marshmallow, and flashing the latest SuperSU zip from TWRP’s install menu gets your J5 rooted too on the 6.0.1 update.
The new TWRP recovery is reportedly working fine for the Galaxy J5 on Marshmallow, and flashing the latest SuperSU zip from TWRP’s install menu gets your J5 rooted too on the 6.0.1 update.
View my Flipboard Magazine.
÷ Prerequisites:
This Tutorial is only for Rooting Samsung Galaxy J5 ( J500H) on Marshmallow 6.0.1 Update.
*Disclaimer:
Android Custom ROM fix ® provide various Firmware Updates and Rooting process along with Custom ROM,Modes,file are all belong to their owners/developers. The autor of this site or the developers are not responsible, if you damage or brick your device.Do it on your own risk and follow the instruction properly.
* Important:
Backup important files stored on your device before proceeding with the steps below, so that in case something goes wrong you’ll have backup of all your important files.

How to Root Samsung Galaxy J5 TWRP on Marshmallow 6.0.1 Update:
1- Download Galaxy J5 TWRP Recovery & SuperSu v2.76 (stable, latest).
2- Unzip the Odin 3.10.6 .zip file and run/open Odin3 v3.10.6.exe file from the extracted files on your PC.
3- (If applicable) Enable OEM unlock:
Go to Settings » About phone » and tap “Build number” seven times to enable “Developer options”.
4- Go back to main Settings page, scroll to bottom and select “Developer options” from there.
5- Under Developer options, look for “Enable OEM unlock” checkbox/toggle and make sure you Check it or turn it ON.
6- Boot your device into Download mode:
Switch off your device.
7- Press and hold “Home + Power + Volume down” buttons for a few seconds until you see a warning screen.
8- Press Volume Up on the warning screen to accept it and boot into Download mode.
9- Once your device is in download mode, connect it to the PC with a USB cable. The Odin window on PC should detect the device and show an “Added!!” message.
10- Now click on the AP tab on Odin window and select the TWRP recovery .tar file that you downloaded for your device.
? Note: DON’T play with any other options on the screen. You’re only required to connect your device and select the TWRP recovery .tar file in the AP tab.
11- Click the Start button on Odin and wait for it to finish the process. Once it has finished successfully, you’ll see a pass message on the Odin screen.
12- Your device will automatically reboot when Odin is done flashing. You can then disconnect your device.
13- Transfer the SuperSU zip file from the download link above to your device’s storage.
14- Boot into TWRP recovery and take a full backup (optional) from the recovery options.
Switch off your device.
Press and hold “Home + Power + Volume Up” buttons for a few seconds and as soon as you see your device’ logo on-screen, release three buttons altogether. Your device will boot into TWRP recovery.
15- Tap on “Install” and select the SuperSU zip file that you transferred to your device .
16- After selecting the .zip file, do “Swipe to Confirm Flash” on the bottom of screen to begin the flashing process.
18- Once SuperSU is flashed, you’ll get “Reboot System” option, select it.

Congratulations! Your Galaxy J5 TWRP should be rooted now. Look for the SuperSU app in app drawer.
For More Samsung Galaxy J5 Update Keep Checking And Android Custom ROM Fix ™®
That’s all. We hope this guide serves you well. If there’s anything you’d like to be added/changed on this page, PLZ Use the comment box below to contribute more ideas & Suggestions .
Like this post? PLZ Hit the share buttons below to share this article with your friends on Facebook, Google + and Twitter.
Want the latest Updates Sign up for our newsletters!
PLZ Follow Us On Flipboard 4 More Latest Updates.
Best Regards.™
÷ Prerequisites:
This Tutorial is only for Rooting Samsung Galaxy J5 ( J500H) on Marshmallow 6.0.1 Update.
*Disclaimer:
Android Custom ROM fix ® provide various Firmware Updates and Rooting process along with Custom ROM,Modes,file are all belong to their owners/developers. The autor of this site or the developers are not responsible, if you damage or brick your device.Do it on your own risk and follow the instruction properly.
* Important:
Backup important files stored on your device before proceeding with the steps below, so that in case something goes wrong you’ll have backup of all your important files.
How to Root Samsung Galaxy J5 TWRP on Marshmallow 6.0.1 Update:
1- Download Galaxy J5 TWRP Recovery & SuperSu v2.76 (stable, latest).
2- Unzip the Odin 3.10.6 .zip file and run/open Odin3 v3.10.6.exe file from the extracted files on your PC.
3- (If applicable) Enable OEM unlock:
Go to Settings » About phone » and tap “Build number” seven times to enable “Developer options”.
4- Go back to main Settings page, scroll to bottom and select “Developer options” from there.
5- Under Developer options, look for “Enable OEM unlock” checkbox/toggle and make sure you Check it or turn it ON.
6- Boot your device into Download mode:
Switch off your device.
7- Press and hold “Home + Power + Volume down” buttons for a few seconds until you see a warning screen.
8- Press Volume Up on the warning screen to accept it and boot into Download mode.
9- Once your device is in download mode, connect it to the PC with a USB cable. The Odin window on PC should detect the device and show an “Added!!” message.
10- Now click on the AP tab on Odin window and select the TWRP recovery .tar file that you downloaded for your device.
? Note: DON’T play with any other options on the screen. You’re only required to connect your device and select the TWRP recovery .tar file in the AP tab.
11- Click the Start button on Odin and wait for it to finish the process. Once it has finished successfully, you’ll see a pass message on the Odin screen.
12- Your device will automatically reboot when Odin is done flashing. You can then disconnect your device.
13- Transfer the SuperSU zip file from the download link above to your device’s storage.
14- Boot into TWRP recovery and take a full backup (optional) from the recovery options.
Switch off your device.
Press and hold “Home + Power + Volume Up” buttons for a few seconds and as soon as you see your device’ logo on-screen, release three buttons altogether. Your device will boot into TWRP recovery.
15- Tap on “Install” and select the SuperSU zip file that you transferred to your device .
16- After selecting the .zip file, do “Swipe to Confirm Flash” on the bottom of screen to begin the flashing process.
18- Once SuperSU is flashed, you’ll get “Reboot System” option, select it.
Congratulations! Your Galaxy J5 TWRP should be rooted now. Look for the SuperSU app in app drawer.
For More Samsung Galaxy J5 Update Keep Checking And Android Custom ROM Fix ™®
That’s all. We hope this guide serves you well. If there’s anything you’d like to be added/changed on this page, PLZ Use the comment box below to contribute more ideas & Suggestions .
Like this post? PLZ Hit the share buttons below to share this article with your friends on Facebook, Google + and Twitter.
Want the latest Updates Sign up for our newsletters!
PLZ Follow Us On Flipboard 4 More Latest Updates.
Best Regards.™
Available link for download
How To samsung galaxy note 4 hard reset
How To samsung galaxy note 4 hard reset
if your forget your Samsung Galaxy Note 4 Pattern lock and gmail lock how do you solve this problem i will show you on this post how do you can solve this problem easily.
For Hard Reset Battery Charge Need 70% Up.After Hard Reset All Data Will Be lost So you should backup your all data.
1. Press And Hold Power Key To Turn Off Your Device.
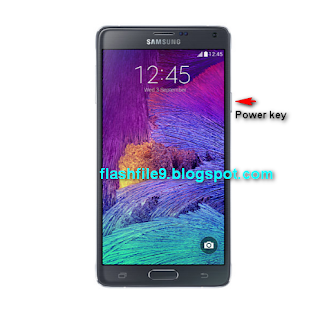
2 After Turn off Your Device Press And Hold Together Volume Up + Home + Power Key To Turn On Your Device.
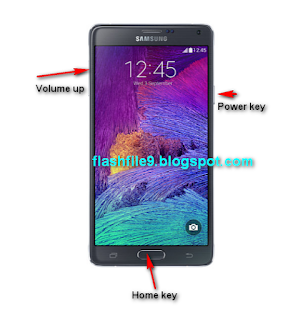
3. When Samsung Logo Show on Screen Release All Keys.
4. Now You Select This Option "wipe data / factory reset" From recover menu. volume Key To Scroll and Power Key To Confirm.
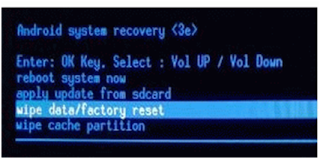
5. After That Chose This "Yes -- delete all user data" Again Press Power key To Confirm.
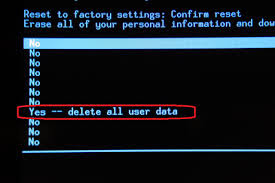
6. you are now in the last step chose "reboot system now" power key to confirm and wait few second device will be auto restart and solve your problem.
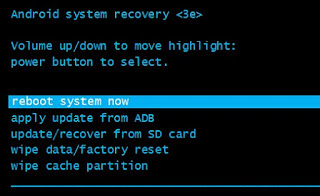
done.
For Hard Reset Battery Charge Need 70% Up.After Hard Reset All Data Will Be lost So you should backup your all data.
1. Press And Hold Power Key To Turn Off Your Device.
2 After Turn off Your Device Press And Hold Together Volume Up + Home + Power Key To Turn On Your Device.
3. When Samsung Logo Show on Screen Release All Keys.
4. Now You Select This Option "wipe data / factory reset" From recover menu. volume Key To Scroll and Power Key To Confirm.
5. After That Chose This "Yes -- delete all user data" Again Press Power key To Confirm.
6. you are now in the last step chose "reboot system now" power key to confirm and wait few second device will be auto restart and solve your problem.
done.
Available link for download
Subscribe to:
Posts (Atom)