Tuesday, February 14, 2017
guide need root how to use fingerprint button as home back and recents button
guide need root how to use fingerprint button as home back and recents button
First you need to root and install TWRP recovery. take a look on the other threads for it.
Install the EX Kernel from here (http://ift.tt/2amOJoY) [ READ THIS THREAD FOR MORE INFORMATION ABOUT COMPATIBILITY]
If everything works fine, this kernel makes you fingerprint work as home button, but to have others functions, intall this app ( http://ift.tt/2ajxHJ1)
Now you can remapp as your wish.
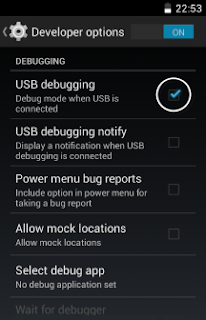
TO REMOVE THE ON SCREEN BUTTONS:
Use any build.prop editor and just add this line ( qemu.hw.mainkeys=1 )
post your screenshots if you enjoy it.
thanks to flar2 for the kernel and app.
from xda-developers http://ift.tt/2a4z41e
via IFTTT
Available link for download
Saturday, October 8, 2016
Help which Frame work do i use for lg stylo
Help which Frame work do i use for lg stylo
from xda-developers http://ift.tt/2amc2PS
via IFTTT
Available link for download
Sunday, October 2, 2016
How To Use SP Flash Tool For Flashing Walton Primo Phones
How To Use SP Flash Tool For Flashing Walton Primo Phones
How to use SP Flash Tool Flashing Your Walton Primo Smartphones Tutorial


Available link for download
Saturday, September 17, 2016
How to access and use Memories in Snapchat for Android
How to access and use Memories in Snapchat for Android

How do I use Snapchat Memories?
Snapchat has announced yet another feature as they continue to expand their platform that originally was created to simply send and receive temporary pictures.
This new feature is called Memories, and its essentially a cumulative archive of all of the snaps youve saved to your phone since you downloaded the app.
But how exactly do you navigate Snapchat Memories, and how does this new feature work? Heres how to use Snapchat Memories to your fullest advantage.
- How to access Memories in Snapchat on Android
- How to access Snaps in Memories on Android
- How to access Stories in Memories on Android
- How to access your Camera Roll in Memories on Android
- How to access My Eyes Only in Memories on Android
- How to post an old Snap to your Snapchat on Android
- How to post part of a saved story to your Snapchat on Android
- How to post a photo from your Camera Roll to your Snapchat on Android
How to access Memories in Snapchat on Android
- Launch Snapchat from your home screen.
-
Tap on the smaller white circle underneath the shutter button to access Memories. You can also swipe up anywhere on the screen.

How to access Snaps in Memories on Android
- Launch Snapchat from your home screen.
- Tap on the smaller white circle underneath the shutter button to access Memories. You can also swipe up anywhere on the screen.
-
Tap the Snaps tab at the top of the screen to access your saved snaps.

How to access Stories in Memories on Android
- Launch Snapchat from your home screen.
- Tap on the smaller white circle underneath the shutter button to access Memories. You can also swipe up anywhere on the screen.
-
Tap the Stories tab at the top of the screen to access your saved stories.

How to access your Camera Roll in Memories on Android
- Launch Snapchat from your home screen.
- Tap on the smaller white circle underneath the shutter button to access Memories. You can also swipe up anywhere on the screen.
-
Tap the Camera Roll tab at the top of the screen to access your Camera Roll.

How to access My Eyes Only in Memories on Android
- Launch Snapchat from your home screen.
- Tap on the smaller white circle underneath the shutter button to access Memories. You can also swipe up anywhere on the screen.
-
Tap the My Eyes Only tab at the top of the screen to access your protected, private snaps.

Type in your password to access your My Eyes Only. Keep in mind that if you have to reset your password, all of the snaps saved to My Eyes Only will be erased.
How to post an old Snap to your Snapchat on Android
- Launch Snapchat from your home screen.
- Tap on the smaller white circle underneath the shutter button to access Memories. You can also swipe up anywhere on the screen.
-
Tap the Snaps tab at the top of the screen to access your saved snaps.
- Tap on the photo or video you would like to post to your Snapchat story or friend.
- Tap and hold the photo. A black border will appear around the photo.
-
Tap the arrow within the blue circle in the lower right corner.


Just like sending a standard snap, select My Story or the contacts you would like to share your photo/video with.
How to post part of a saved story to your Snapchat on Android
- Launch Snapchat from your home screen.
- Tap on the smaller white circle underneath the shutter button to access Memories. You can also swipe up anywhere on the screen.
-
Tap the Stories tab at the top of the screen to access your saved stories.
- Tap and hold the story bubble you would like to select.
- Swipe left or right to pick a specific snap in the story bubble to post.
-
Tap the arrow within the blue circle in the lower right corner.


Just like sending a standard snap, select My Story or the contacts you would like to share your story photo/video with.
How to post a photo from your Camera Roll to your Snapchat on Android
- Launch Snapchat from your home screen.
- Tap on the smaller white circle underneath the shutter button to access Memories. You can also swipe up anywhere on the screen.
-
Tap the Camera Roll tab at the top of the screen to access your Camera Roll.
- Tap and hold the photo or video you would like to post from Camera Roll.
-
Tap the arrow within the blue circle in the lower right corner.


Just like sending a standard snap, select My Story or the contacts you would like to share your story photo/video with.
from Android Central - Android Forums, News, Reviews, Help and Android Wallpapers http://ift.tt/2aa8U83
via IFTTT
Available link for download
Wednesday, September 14, 2016
Make Some Extra Money With Payoneer by Refering your friends and family to use Payoneer…
Make Some Extra Money With Payoneer by Refering your friends and family to use Payoneer…
 |
| Referral Reward |
- Signup for payoneer(wait until your account is approved for Payoneer credit car. It may take upto one month for approval of new account).
- Login to your account. You will see a banner on homepage like image below. Move cursor on banner and click on “login”.
- Now you have access to payoneer refer your friend programe. From there you can invite your friends by entering their email addresses. Click on “facebook”and “twitter” icon to share your referral link with facebook friends and twitter followers automatically . But If you want to share referral link manually anywhere on the internet then click on “link” icon and get your referal link and place it on your website or share it on social media to make more money.
Thanks for Reading with Interest. If your facing problem in getting your referral link share your problem in comment box I will help you to fix it thanks.
Refer your friend Dashboard
 |
| Payoneer homapage. refer your friend |
Available link for download
Wednesday, September 7, 2016
How many cloud storage services do you use
How many cloud storage services do you use

Thanks to family, I take a lot of photos and video. My smartphone has become my camera of choice these days, and has been for several years now, and with that I’ve gradually focused on buying devices that have more built-in storage. I’ve shied away from microSD cards over the years, as I’ve just kept what I can on my device of choice, and putting the rest up in the cloud.
from PhoneDog.com - Latest videos, reviews, articles, news and posts http://ift.tt/2aaSgtd
via IFTTT
Available link for download
Wednesday, August 31, 2016
How to use SP Flash Tool to fix MTK devices
How to use SP Flash Tool to fix MTK devices

If you are an Android geek & love to play with custom ROMs, recoveries & Kernels, one day youll encounter a hard bricked device. Now what does hard brick mean? If you cant boot up your device, cannot get into recovery mode or see boot logo this would actually leave your device in a state where it is not more than a brick. SP Flash tool is an application for Windows & linxu which you could find very useful in fixing extreme cases of a bricked MTK Android. SP Flash Tool also known as Smartphone Flash Tool provides many options like flashing custom or stock recoveries or Kernel (boot.img). As Mediatek Smartphone dont have an Official tool for any such problems, SP Flash tool is really a boon for Mediatek Smartphone users. To learn more about this tiny yet effective tool, refer our guide: SP Flash tool - Complete Guide. Now, without wasting much time, lets get started with unbricking your Smartphone.
- A PC with Windows or Linux OS.
- USB Cord
- Manually install VCOM drivers on the PC
- Your bricked Android device.
- Original/Working Stock ROM (Do a proper research as flashing the wrong ROM would permanently brick your device)
- Download SP Flash tool Latest version
- Open Device manager from My computer. Click on any item & Goto Actions > Add legacy hadware.
- Now, Press next & select Install drivers manually.
- Press next & click on Have disk.
- From the browse option, select the VCOM drivers as per your OS.
- Once its done. You will see a screen similar to this:


1. Remove the battery from the phone and slot it back in without booting the phone (If the battery is inbuilt then simply switch if off). Also, ensure theres no SD card in the phone (if theres an SD card slot)
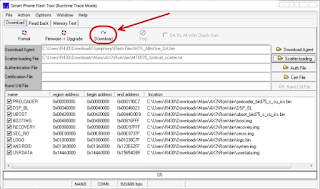
2. Launch SP Flash Tool as Administrator
 | ||
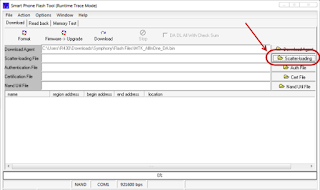
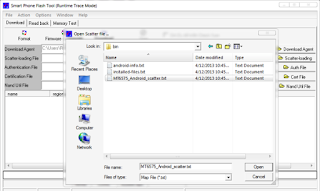
| SP Flash Tool 3. Click on Scatter-loading option & browse to the scatter file of your Stock ROM. (You can find the scatter file with the original stock rom zip file)
|

4. Now, if you want to format your phone, Click Format at the top.
5. Once you are done with everything, click on the download button at the top of the window
 |
| Start flashing 6. Stop should now be prominent while other options should be grayed out 7. Connect the switched off phone (with battery inside) to the PC via USB cord 8. A progress bar should start running 9. Disconnect the phone, remove the battery for 15 seconds (if removable), slot it back in then power up the phone.  Final words As the procedure is bit complex for newbies. However, I have tried to make it as simple as possible. Dont worry! if you are stuck at any point, you can contact us from the below comment form. |
Available link for download