Sunday, February 12, 2017
Infinix Not 2 X600 Custom ROM Flash File Firmware Download Free
Infinix Not 2 X600 Custom ROM Flash File Firmware Download Free

Now download the latest Stock ROM of your mobile and put it in one specific folder in C:Program Files. Because during flashing you find it easily. This flash file in small sizes, so it will take little bit time during downloading. This flash file is tested and well working and cleaned by dangerous viruses. If download links are not working or you are facing difficulties during downloading please contact us via commenting, we will update download links very soon.
Download links
Infinix Not 2 Stock ROM
Available link for download
Wednesday, January 11, 2017
custom kernel for stock 236
custom kernel for stock 236
I trying to change governors in the stock kernel/rom but they keep reverting to initial values, in slim rom can stop the cores which is what Im looking for but the camera is very bad compared with stock.
thanks to all.
from xda-developers http://ift.tt/2ad1uUh
via IFTTT
Available link for download
Sunday, January 8, 2017
Chrome custom tabs smooth the transition between apps and the web
Chrome custom tabs smooth the transition between apps and the web
Originally posted on the Chromium blog
Posted by Yusuf Ozuysal, Chief Tab Customizer
Android app developers face a difficult tradeoff when it comes to showing web content in their Android app. Opening links in the browser is familiar for users and easy to implement, but results in a heavy-weight transition between the app and the web. You can get more granular control by building a custom browsing experience on top of Android’s WebView, but at the cost of more technical complexity and an unfamiliar browsing experience for users. A new feature in the most recent version of Chrome called custom tabs addresses this tradeoff by allowing an app to customize how Chrome looks and feels, making the transition from app to web content fast and seamless.
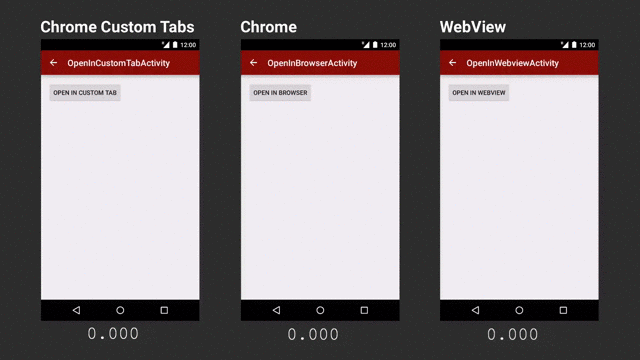
Chrome custom tabs allow an app to provide a fast, integrated, and familiar web experience for users. Custom tabs are optimized to load faster than WebViews and traditional methods of launching Chrome. As shown above, apps can pre-load pages in the background so they appear to load nearly instantly when the user navigates to them. Apps can also customize the look and feel of Chrome to match their app by changing the toolbar color, adjusting the transition animations, and even adding custom actions to the toolbar so users can perform app-specific actions directly from the custom tab.
Custom tabs benefit from Chrome’s advanced security features, including its multi-process architecture and robust permissions model. They use the same cookie jar as Chrome, allowing a familiar browsing experience while keeping users’ information safe. For example, if a user has signed in to a website in Chrome, they will also be signed in if they visit the same site in a custom tab. Other features that help users browse the web, like saved passwords, autofill, Tap to Search, and Sync, are also available in custom tabs.
Custom tabs are easy for developers to integrate into their app by tweaking a few parameters of their existing VIEW intents. Basic integrations require only a few extra lines of code, and a support library makes more complex integrations easy to accomplish, too. Since custom tabs is a feature of Chrome, it’s available on any version of Android where recent versions of Chrome are available.
Users will begin to experience custom tabs in the coming weeks in Feedly, The Guardian, Medium, Player.fm, Skyscanner, Stack Overflow, Tumblr, and Twitter, with more coming soon. To get started integrating custom tabs into your own application, check out the developer guide.
Available link for download
Friday, December 16, 2016
How to Install Official TWRP 3 0 2 Custom Recovery Image on OnePlus 3
How to Install Official TWRP 3 0 2 Custom Recovery Image on OnePlus 3

You can install it immediately on your phone via this quick and simple guide.
÷ Prerequisites:
•This TWRP Recovery tutorial is only for unlocked OnePlus 3. Please don’t try this on any other variants of the phone.
•Make sure you backup all your data in your phone before proceeding.
•This will void your warranty.
•You need to have working Fastboot / ADB on your computer.
•Bootloader should be unlocked.
*Disclaimer:
Android Custom ROM fix ® provide various Firmware Updates and Rooting process along with Custom ROM,Modes,file are all belong to their owners/developers. The autor of this site or the developers are not responsible, if you damage or brick your device.Do it on your own risk and follow the instruction properly.
* Important:
Backup important files stored on your device before proceeding with the steps below, so that in case something goes wrong you’ll have backup of all your important files.

÷ How to Install Official TWRP 3.0.2 Custom Recovery Image on OnePlus 3:
Step 1 – Download Fastboot / ADB package and extract it anywhere in your computer.
Step 2 – Turn OFF your phone.
Step 3 – Connect your OnePlus 3 to your computer using a USB cable.
Step 4 – Download TWRP (oneplus3-twrp-recovery.img) and save it into the same directory as the extracted Fastboot/ADB package files.
Step 5 – Now go into Fastboot/Bootloader Mode on OnePlus 3. How? Press Volume Up + Power keys for a few seconds till you see some text on the screen. This is Bootloader Mode.
Step 6 – Navigate to the same directory now as where you have Fastboot (i.e. Step 1) and on Windows: Open Command Prompt (Shift + Right-click > Open Command Prompt). For Mac OS X and Linux, use Terminal to navigate to this directory.
Step 7 – Type in the following command and press Enter.
fastboot flash recovery twrp-3.0.2-0-oneplus3.img
Step 8 – Enter Recovery Mode (TWRP recovery) now. Turn OFF your phone. Now press and hold the Volume Down + Power keys together until the OnePlus logo shows up. Once it does, release the Power button while still holding the Volume Down button until a screen similar to the following screenshot shows up.

That’s it! You should now be in the TWRP Recovery from where you can choose whatever function you want to perform.
For More One Plus 3 latest Updates Keep Checking Android Custom ROM Fix ™®
That’s all. We hope this guide serves you well. If there’s anything you’d like to be added/changed on this page, PLZ Use the comment box below to contribute more ideas & Suggestions .
Like this post? PLZ Hit the share buttons below to share this article with your friends on Facebook, Google + and Twitter.
Want the latest Updates Sign up for our newsletters!
PLZ Follow Us On Flipboard 4 More Latest Updates.
Best Regards.™
Available link for download
Wednesday, December 7, 2016
How to Install Android 6 0 1 Marshmallow MoKee Custom ROM on Galaxy S3 I9300
How to Install Android 6 0 1 Marshmallow MoKee Custom ROM on Galaxy S3 I9300
Samsung Galaxy S3 I9300 MoKee custom ROM comes with tons of new features and is based on Android 6.0.1 Marshmallow. A quick list of the main features in MoKee is given below and we are sure you’d love to use this on your Galaxy S3 I9300:

Listview animation
Interpolation anmação listview
Update over the air can download the download website only incremental, it helps lower faster update and upgrade more easily:
Some icons and own layouts
Manager for Google services, so no need to use a large gapps, you can only download necessary at MokeeCenter
Ringtones, Alarms, Notification, UI sounds are all different CyanogenMod, thus bringing a beautiful charm to rom
bootianimation own
information integrated into MokeeCenter
Settings to add speed data network
Settings for navigation bar
Settings for Statusbar
Intelligent control settings to configure the newer apps and others....
You can find out how to apply it right now via this easy tutorial
÷ Prerequisites:
•This tutorial is only for installing MoKee Android 6.0.1 ROM on Samsung Galaxy S3 I9300. Please do not try on any other Galaxy S III variants.
•Your phone should be rooted and have ClockworkMod recovery installed from before.
This tutorial will wipe out all your data. Proceed at your own risk.
•Perform a Dalvik Cache wipe before proceeding from the recovery mode.
•Samsung KIES will NOT detect your phone after installing this ROM because it is a custom firmware.
•Make sure you backup all your data in your phone before proceeding.
*Disclaimer:
Android Custom ROM fix ® provide various Firmware Updates and Rooting process along with Custom ROM,Modes,file are all belong to their owners/developers. The autor of this site or the developers are not responsible, if you damage or brick your device.Do it on your own risk and follow the instruction properly.
* Important:
Backup important files stored on your device before proceeding with the steps below, so that in case something goes wrong you’ll have backup of all your important files.

÷ How to Install Android 6.0.1 Marshmallow MoKee Custom ROM on Galaxy S3 I9300:
Step 1 – Download MoKee Android 6.0.1 ROM and Google Apps for Galaxy S III to your computer.
Step 2 – Connect and mount your Galaxy S3 USB memory on your computer using the USB cable.
Step 3 – Now copy/paste the downloaded Android 6.0.1 ROM zip and Google Apps zip files to your SD card. Make sure the files are in the SD card root (not in any folder).
Step 4 – Then turn OFF your phone and disconnect from the USB cable.
Step 5 – Now to get in the Recovery Mode. Switch ON the phone while pressing and holding Volume Up + Home + Power buttons together.
Step 6 – Once you are in ClockworkMod Recovery, select perform a full data wipe by selecting “wipe data/factory reset”. Use the Power button to select everything while in the Recovery Mode.
Step 7 – Then, perform a cache wipe by selecting “wipe cache partition”.
Step 8 – Now this is optional, but it is recommended to perform a wipe of your dalvik cache as well. You will not get into boot loops or any other errors. From CWM recovery, go to ‘advanced’ and then select “wipe dalvik cache”.
Step 9 – Then go back to the main recovery screen and select “install zip from SD card”.
Step 10 – Now select “choose zip from sdcard”. Using your volume keys, navigate to the Android 6.0.1 ROM zip file that you copied to your SD card and select it using the Power button. Confirm the installation on the next screen and the installation procedure should start now.
Google Apps: Repeat the above step for the Gapps zip file as well and install it on your phone.
Step 11 – After the installation completes, go to “+++++Go Back+++++” and reboot the phone by selecting “reboot system now” from the recovery menu.

Your Galaxy S3 I9300 will boot now and it might take about 5 minutes to boot on your first time. So, please wait.
That’s it! Your Galaxy S3 should now have MoKee Android 6.0.1 Marshmallow custom ROM installed on your phone! Go to Settings > About phone to verify.
For More Samsung Galaxy S3 Updates Keep Checking Android Custom ROM Fix ™®
That’s all. We hope this guide serves you well. If there’s anything you’d like to be added/changed on this page, PLZ Use the comment box below to contribute more ideas & Suggestions .
Like this post? PLZ Hit the share buttons below to share this article with your friends on Facebook, Google + and Twitter.
Want the latest Updates Sign up for our newsletters!
PLZ Follow Us On Flipboard 4 More Latest Updates.
Best Regards.™
Available link for download
Wednesday, November 16, 2016
HTC Desire 816g Stock ROM Custom ROM Firmware Flash File Download Free
HTC Desire 816g Stock ROM Custom ROM Firmware Flash File Download Free

Now you can download latest Stock ROM of HTC Desire 816g from below downloading links. If downloading links are not working or you are unable to download stock ROM of your mobile feel free to contact us via commenting we will update downloading links. We will update or change downloading links.
Downloading links
HTC Desire 816g Flash File/Stock ROM (Official Server)
Available link for download
Saturday, November 12, 2016
Custom ROM to Stock ROM
Custom ROM to Stock ROM
from xda-developers http://ift.tt/2a75YhR
via IFTTT
Available link for download
Tuesday, October 11, 2016
Install Android 6 0 1 Marshmallow Revolution Custom ROM on HTC One M8
Install Android 6 0 1 Marshmallow Revolution Custom ROM on HTC One M8

•Android 6.0.0 (Marshmallow) – latest official HTC One 6.12.401.4_R (WWE) firmware (53.x series)
•This is improved version of stock ROM – no visual changes!
•Very fast, clean & stable!
•Full HTC Sense 7.0 Interface
•Multi-language (WWE)
•For HTC One M8
•Thanks to HTC for the base firmware.
÷ Prerequisites:
•This tutorial is only for installing Android 6.0.1 Android Revolution ROM on HTC One M8. Please do not try on any other One M8 variants.
•Your phone should have a custom recovery installed in order to install this Android
Revolution ROM on your phone.
•We will be using TWRP Recovery for this tutorial.
•Bootloader should be unlocked.
•This tutorial will wipe out all your data. Make sure you backup all your data in your phone before proceeding.
•Perform a Dalvik Cache wipe before proceeding from the Recovery Mode.
*Disclaimer:
Android Custom ROM fix ® provide various Firmware Updates and Rooting process along with Custom ROM,Modes,file are all belong to their owners/developers. The autor of this site or the developers are not responsible, if you damage or brick your device.Do it on your own risk and follow the instruction properly.
* Important:
Backup important files stored on your device before proceeding with the steps below, so that in case something goes wrong you’ll have backup of all your important files.

÷ Install Android 6.0.1 Marshmallow Revolution Custom ROM:
Step 1 – Download Android 6.0.1 Android Revolution ROM for One M8 to your computer and extract boot.img from the zip file separately.
Step 2 – Connect and mount your One M8 USB memory to your computer using the USB cable.
Step 3 – Now copy/paste the downloaded Android 6.0.1 ROM zip file to your phone memory / SD card. Make sure the file is in the phone memory / SD card root (not in any folder).
Step 4 – Copy/paste the boot.img file to android-sdk-windowsplatform-tools directory.
Step 5 – Then turn OFF your phone and disconnect from the USB cable.
Step 6 – Now to get in the Bootloader/Fastboot Mode. Turn ON the phone while pressing and holding the Volume Down + Power buttons.
Step 7 – Once in the Fastboot mode (on your phone), navigate to android-sdk-windowsplatform-tools directory (on your computer) and open Command Prompt (Shift + Right-click > Open Command Prompt).
Step 8 – Type the following command and press Enter.
fastboot flash boot boot.img
Step 9 – Then, type the following command and press Enter.
fastboot reboot
Step 10 – Follow the navigation instructions on the screen. Select BOOTLOADER and then go to RECOVERY.
Step 11 – Once you are in TWRP Recovery, perform a full data wipe by tapping on the ‘Wipe’ button. Then swipe on the “Swipe to Factory Reset” option at the bottom.
Step 12 – Now go back to the main menu and then tap on the ‘Install’ button. From the list, choose the ZIP file that you copied to your phone memory in Step 3.
Step 13 – Confirm installation on the next screen by swiping on the “Swipe to Confirm Flash” option. The installation procedure should start now.
Step 14 – Once the installation is completed.
Step 15 – Tap on the “Wipe cache/dalvik” button if you get into any boot loops or other issues.
Step 16 – You can now reboot your phone by selecting the “Reboot System” button.
Your HTC One M8 will boot now and it might take about 5 minutes to boot on your first time after flashing a new ROM. So, please wait.

That’s it! Your HTC One M8 should now have Android 6.0.1 Android Revolution Marshmallow custom ROM installed on your phone! Go to Settings > About phone to verify.
For More HTC one M8 Update Keep Checking Android Custom ROM Fix ™®
That’s all. We hope this guide serves you well. If there’s anything you’d like to be added/changed on this page, PLZ Use the comment box below to contribute more ideas & Suggestions .
Like this post? PLZ Hit the share buttons below to share this article with your friends on Facebook, Google + and Twitter.
Want the latest Updates Sign up for our newsletters!
PLZ Follow Us On Flipboard 4 More Latest Updates.
Best Regards.™
Available link for download
Custom ROM HTC Desire D816h
Custom ROM HTC Desire D816h
phone : Dual Sim
processor : MT6592 (octa core)
RAM : 1 GB
Help me please, and very thinks
from xda-developers http://ift.tt/2ad19Bc
via IFTTT
Available link for download
Monday, October 3, 2016
How to Update Xperia Z3 to Android 6 0 1 Marshmallow Moonwalker Custom ROM
How to Update Xperia Z3 to Android 6 0 1 Marshmallow Moonwalker Custom ROM
Sony Xperia Z3 Moonwalker custom ROM comes with tons of new features and is based on Android 6.0.1 Marshmallow.

Don’t worry we are going to share step by step guide to safely Install Android 6.0.1 Marshmallow Moonwalker Custom ROM on your Sony Xperia Z3.
÷ Prerequisites:
•This tutorial is only for installing Android 6.0.1 Moonwalker ROM on Sony Xperia Z3. Please do not try on any other Xperia Z3 variants.
•Your phone should be rooted and have ClockworkMod recovery installed from before.
•This tutorial will wipe out all your data. Proceed at your own risk.
•Perform a Dalvik Cache wipe before proceeding from the recovery mode.
•Sony PC Companion will NOT detect your phone after installing this ROM because it is a custom firmware.
•Bootloader should be unlocked or you will not be able to install this ROM.
•Make sure you backup all your data in your phone before proceeding.
*Disclaimer:
Android Custom ROM fix ® provide various Firmware Updates and Rooting process along with Custom ROM,Modes,file are all belong to their owners/developers. The autor of this site or the developers are not responsible, if you damage or brick your device.Do it on your own risk and follow the instruction properly.
* Important:
Backup important files stored on your device before proceeding with the steps below, so that in case something goes wrong you’ll have backup of all your important files.

÷ How to : Update Xperia Z3 to Android 6.0.1 Marshmallow Moonwalker Custom ROM:
Step 1 – Download Moonwalker Android 6.0.1 ROM for Sony Xperia Z3 to your computer and extract boot.img from the zip file separately.
Step 2 – Connect and mount your Sony Xperia Z3 USB (mass) memory on your computer using the USB cable.
Step 3 – Now copy/paste the downloaded Android 6.0.1 ROM zip file to your SD card. Make sure the file is in the SD card root.
Step 4 – Copy/paste the boot.img file to android-sdk-windowsplatform-tools directory.
Step 5 – Then turn OFF your phone.
Step 6 – Now to get into the Bootloader Mode. Press and hold the Volume Up button while connecting it again with the USB cable. Your phone LED will turn blue and it will get into the Bootloader Mode.
Step 7 – Once in the Fastboot mode (on your phone), navigate to android-sdk-windowsplatform-tools directory (on your computer) and open Command Prompt (Shift + Right-click > Open Command Prompt).
Step 8 – Type the following command and press Enter.
fastboot flash boot boot.img
Step 9 – Then, type the following command and press Enter.
fastboot reboot
Step 10 – Now to get in the Recovery Mode. Switch ON the phone while pressing the Volume Up or Volume Down buttons a few times when you see the LED light turn pink or any other colour.
Step 11 – Once you are in ClockworkMod Recovery, select perform a full data wipe by selecting “wipe data/factory reset” . Use the Power button to select everything while in the Recovery Mode.
Step 12 – Then, perform a cache wipe by selecting “wipe cache partition” .
Step 13 – Now this is optional, but it is recommended to perform a wipe of your dalvik cache as well. You will not get into boot loops or any other errors. From CWM recovery, go to ‘advanced’ and then select “wipe dalvik cache”.
Step 14 – Then go back to the main recovery screen and select “install zip from SD card”.
Step 15 – Now select “choose zip from sdcard”. Using your volume keys, navigate to the Android 6.0.1 ROM zip file that you copied to your SD card and select it using the Power button. Confirm the installation on the next screen and the installation procedure should start now.
Step 16 – After the installation completes, go to “+++++Go Back+++++” and reboot the phone by selecting “reboot system now” from the recovery menu.

Your Xperia Z3 will boot now and it might take about 5 minutes to boot on your first time. So, please wait.
That’s it! Your Xperia Z3 should now have Android 6.0.1 Moonwalker Marshmallow custom ROM installed on your phone! Go to Settings > About phone to verify.
For More Sony Xperia Z3 Update Keep Checking Android Custom ROM Fix ™®
That’s all. We hope this guide serves you well. If there’s anything you’d like to be added/changed on this page, PLZ Use the comment box below to contribute more ideas & Suggestions .
Like this post? PLZ Hit the share buttons below to share this article with your friends on Facebook, Google + and Twitter.
Want the latest Updates Sign up for our newsletters!
PLZ Follow Us On Flipboard 4 More Latest Updates.
Best Regards.™
Available link for download
Tuesday, September 20, 2016
Google Maps shows cursor on all custom ROMs with video
Google Maps shows cursor on all custom ROMs with video
This is a weird one, so I will start from the beginning.
1. I was in latest official ROM on the m8.
2. I unlocked bootloader
3. I rooted
4. Flashed several ROMs like Dirty Unicorns or Resurrection Remix
5. All these ROMs have the same problem, Google maps is unstable (see video) and some other maps as well, like sometimes chrome downloading a file.
Video showing the issues in google maps with Dirty Unicorns ROM
I have tried Skydragon and it doesnt have these issues.
Any ideas please?
from xda-developers http://ift.tt/2am9Ac9
via IFTTT
Available link for download
Saturday, August 13, 2016
How Install custom Blogger template Complete Step by Step Guide
How Install custom Blogger template Complete Step by Step Guide
when you download Blogger template it is compressed in zip folder you need to extract all files, if you have wndows XP then you need to winrar.exe to extract files, but if you have windows 7/8 then just right click on the compressed folder which you downloaded and then click on extract files.
Now follow these simple step to apply your downloaded template to your blogspot.
Steps

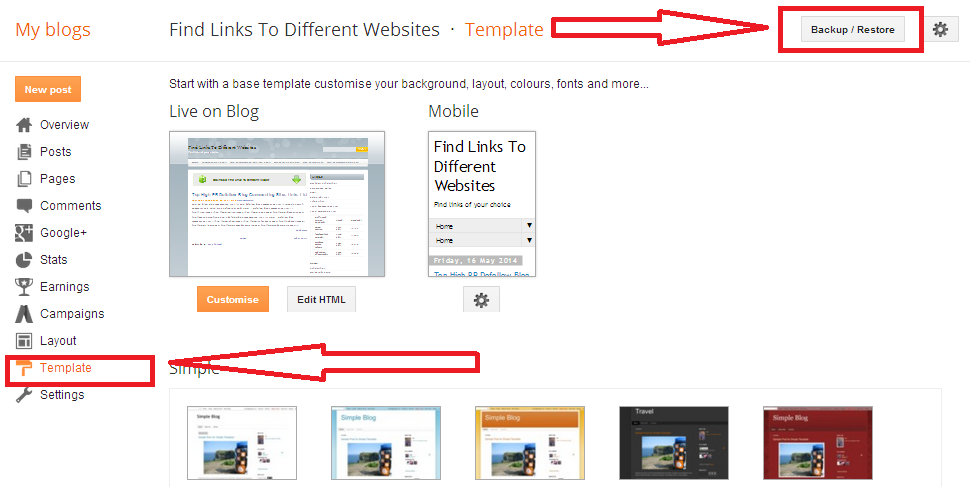
3. Then click on "Choose File".
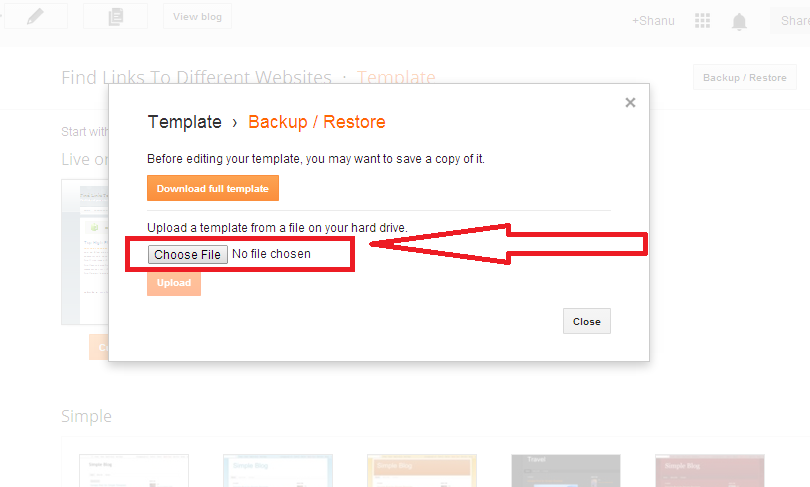
NOTE: If you select another file type then it will show error.
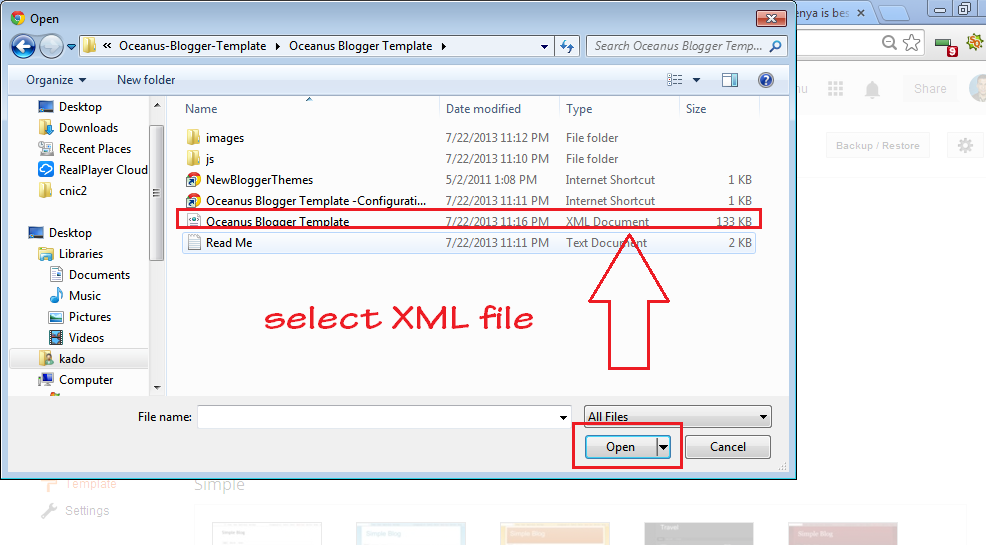
5. After selecting XML file Click on "upload" to change your blog template.
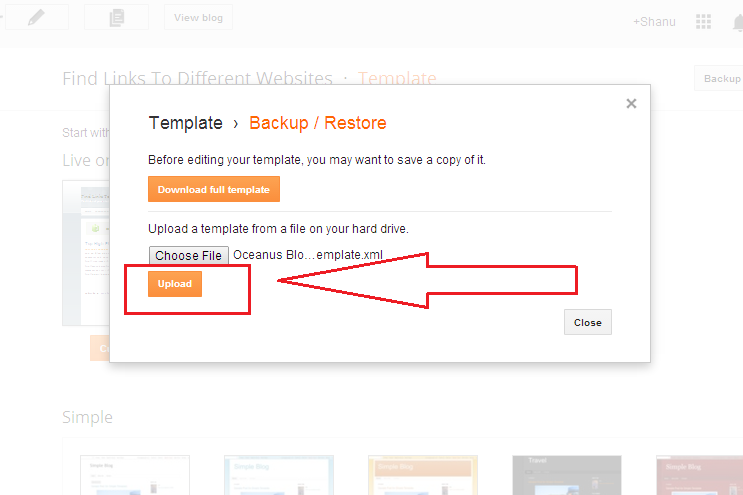
GREAT :) You have sucessfully Change your blogger template. Now open your Blog and referesh it you will new look and new changes.....

If you think this tutorial is useful or need more help then comment box is for you. Please share your Ideas....
Available link for download