Wednesday, August 31, 2016
Huawei E5878 Unlock Code Download Firmware Specs
Huawei E5878 Unlock Code Download Firmware Specs
 Huawei E5878 LTE FDD Cat4 Mobile Hotspot Router
 Chipset: HiSilicon
* Built-in LTE / UMTS / GSM / WLAN main antenna
* Built-in DHCP Server, DNS RELAY and NAT
* LED Indicator: Signal, Wi-Fi, Battery, SMS
* One touch connection, 5s quick startup time
Download (Télécharger) Firmware Update Huawei E5878 Huawei E5878 Unlocked Full Specs, Features, Reviews and Price:
| General | |
|---|---|
| Model | E5878 |
| Sub Model | E5878s-32 |
| Brand | HUAWEI |
| Type | 4G Mobile WiFi |
| Ports | 1x Micro USB |
| Dimensions | |
|---|---|
| Weight | <80 g |
| Height | 109.5 mm |
| Width | 58.0 mm |
| Depth | 7.5 mm |
| Frequency Bands | |
|---|---|
| 4G: LTE FDD | 800 MHz, 850 MHz, 900 MHz, 1800 MHz, 2100 MHz, 2600 MHz |
| 3G: WCDMA/UMTS | 850 MHz, 900 MHz, 1900 MHz, 2100 MHz |
| 2G: GSM/GPRS/EDGE | 850 MHz, 900 MHz, 1800 MHz, 1900 MHz |
| Connectivity Speed | |
|---|---|
| LTE DL | 150 Mbps |
| LTE UP | 50 Mbps |
| DC-HSPA+ | 42.2 Mbps |
| HSPA+ | 21.6 Mbps |
| HSDPA | 14.4 Mbps |
| HSUPA | 5.76 Mbps |
| Battery | |
|---|---|
| Type | Li-ion battery |
| Capacity | 3.7v, 1900mAh |
| Power Supply | AC: 100–240 Volt, DC: 5 Volt |
| Life Time | 6 Hours |
| Standby Time | 380 Hours |
| WiFi Connection | |
|---|---|
| WLAN Band | 2.4 GHz |
| Protocols | IEEE 802.11b/g/n |
| Encryption | WEP, WPA, WPA2 |
| Wi-Fi Devices | 11 Users |
| Additional Features | |
|---|---|
| Display | OLED screen |
| Button | Power ? Reset ? WPS |
| MicroSD card slot | No |
| External antenna connector | No |
| SMS Service | Yes |
| Plug and Play | Yes |
| Other Features | Online software upgrade, support Mobile WiFi App, traffic statistic |
| System Requirements | |
|---|---|
| Operating System | Windows 2000 * Windows XP * Windows Vista * Windows 7 & 8 * Mac |
Available link for download
Cómo Intermitente Rom Firmware UMI Super Via SP Flashtool
Cómo Intermitente Rom Firmware UMI Super Via SP Flashtool

- ARCHIVOS NECESARIOS :
- los USB drivers para el MTK65XX [DESCARGAR]
- los USB drivers para el MTK6577 [DESCARGAR]
- All Driver Bq Aquaris [DESCARGAR]
- SP FlashTool [DESCARGAR]
- Rom, Firmware UMI Super [DESCARGAR]
- Bateria por lo menos al 50%
- PASOS A SEGUIR :
- Instale el controlador USB de Mediatek MTK
- Descargar el firmware UMI Super Extraer el contenido Firmware
- Asegurarnos de que el móvil tenga por lo menos un 50% de batería. Al realizar también se borrarán los contenidos del teléfono; por lo tanto, no hay que olvidarse de hacer una copia de los datos que no queramos perder.
- Apagar el Elephone UMI Super
- Abrir el directorio "SP Flash Tool" y ejectuar "Flash_tool.exe"
- Una vez ejectuado, clickar en "Scatter Loding" y seleccionar el siguiente firmware:
- Pulsar en el botón "Download". Pulsar "yes" en los diálogos de conformación que aparezcan.
- Conectar el teléfonono mediante el USB y apagar el teléfono
- Conectar el cable USB al UMI Super
- Un nuevo dispositivo será detectetado (MediaTek Preloader USB VCOM Port)
- Después de encenderse el móvil debería empezar a actualizarse el firmware.
apaga el celular, reinicia en Recovery Mode y realiza un wipe data y wipe cache.
Available link for download
Bluetooth connectivity
Bluetooth connectivity
Any help is appreciated
from xda-developers http://ift.tt/2a0DCQt
via IFTTT
Available link for download
Déblocage Unlock Huawei E5 Pocket Mobile WiFi Hotspot
Déblocage Unlock Huawei E5 Pocket Mobile WiFi Hotspot
Cette solution de déblocage par code fonctionne avec les routeurs Huawei E5 appelés Pocket Mobile Hotspot ou Mobile WiFi, ces modèles proposent un accès internet haut débit suffisant pour partager votre connexion internet entre plusieurs ordinateurs et autres types d’appareils avec un dispositif Wi-Fi (iPad, iPhone, iTouch, Windows Phone, Smartphone, Tablette).
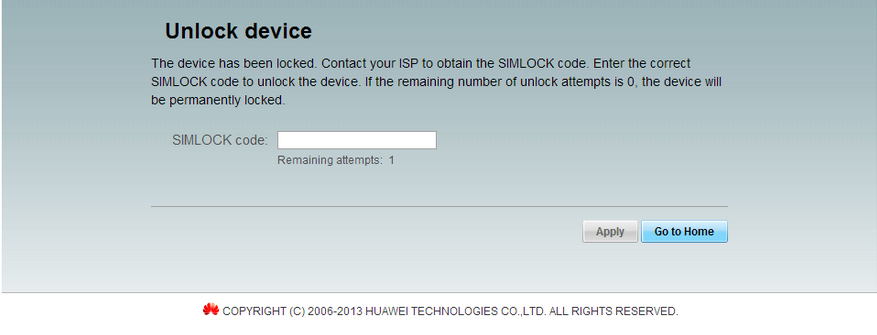
ACHETEZ VOTRE CODE DE DÉBLOCAGE – MAINTENANT! Notre service de déblocage vous offre la possibilité dobtenir votre code de déblocage en 5 minutes, satisfaction 100% garantie. COMMANDEZ MAINTENANT. Il est dangereux dutiliser des codes erronés pour débloquer votre routeur Huawei, si vous dépassez le nombre de tentatives autorisées votre appareil sera bloqué définitivement. Vous pouvez essayer de générer votre code de déblocage à partir de: Huawei Calculator v3 ou IMEI Unlock Code Generator
pocket wifi router, portable 3g router, wirelss hotspot, mobile mifi wifi hotspot, pocket mobile wifi, huawei code calculator v201 algo, unlock huawei, huawei unlock code calculator, unlock huawei, deverrouiller, cracker, deverrouillage, deblocage, huawei calculator v3, huawei imei calculator, huawei modem code generator, NCK codes, flash code calculator, modem unlock, online huawei calculator new algo, simlock code, unlock sim code, sim unlock code
Available link for download
Huawei E170 Unlock Code Download Firmware Specs
Huawei E170 Unlock Code Download Firmware Specs
* Plug and Play software installation
* Supports SMS service and data statistics
* Equalizer
* LED Indicator
Download Huawei E170 Firmware Update Huawei E170 Unlocked - Specification, Features and Reviews:
| General | |
|---|---|
| Model | E170 |
| Brand | HUAWEI |
| Type | 3G USB Modem |
| Ports | USB 2.0 High Speed |
| Modem | |
|---|---|
| Chipset | Qualcomm MSM7200 |
| Firmware | 11.415.05.03.00.B409 |
| Algorithm | OLD ALGO |
| Hardware ver. | CD96TCPU |
| Dimensions | |
|---|---|
| Weight | <30 g |
| Height | 80.5 mm |
| Width | 24.1 mm |
| Depth | 11.8 mm |
| Frequency Bands | |
|---|---|
| WCDMA/UMTS | 850 MHz, 1900 MHz, 2100 MHz |
| GSM/GPRS/EDGE | 850 MHz, 900 MHz, 1800 MHz, 1900 MHz |
| Connectivity Speed | |
|---|---|
| HSDPA | 7.2 Mbps |
| HSUPA | 2.0 Mbps |
| UMTS | 384 kbps |
| EDGE | 236.8 kbps |
| GPRS | 57.6 kbps |
| Memory Support | |
|---|---|
| Memory Capacity | 8 GB |
| Memory Card Slot | SD Card |
| System Requirements | |
|---|---|
| Operating System | Windows 2000 * Windows XP * Windows Vista * Mac OS |
Available link for download
How to use SP Flash Tool to fix MTK devices
How to use SP Flash Tool to fix MTK devices

If you are an Android geek & love to play with custom ROMs, recoveries & Kernels, one day youll encounter a hard bricked device. Now what does hard brick mean? If you cant boot up your device, cannot get into recovery mode or see boot logo this would actually leave your device in a state where it is not more than a brick. SP Flash tool is an application for Windows & linxu which you could find very useful in fixing extreme cases of a bricked MTK Android. SP Flash Tool also known as Smartphone Flash Tool provides many options like flashing custom or stock recoveries or Kernel (boot.img). As Mediatek Smartphone dont have an Official tool for any such problems, SP Flash tool is really a boon for Mediatek Smartphone users. To learn more about this tiny yet effective tool, refer our guide: SP Flash tool - Complete Guide. Now, without wasting much time, lets get started with unbricking your Smartphone.
- A PC with Windows or Linux OS.
- USB Cord
- Manually install VCOM drivers on the PC
- Your bricked Android device.
- Original/Working Stock ROM (Do a proper research as flashing the wrong ROM would permanently brick your device)
- Download SP Flash tool Latest version
- Open Device manager from My computer. Click on any item & Goto Actions > Add legacy hadware.
- Now, Press next & select Install drivers manually.
- Press next & click on Have disk.
- From the browse option, select the VCOM drivers as per your OS.
- Once its done. You will see a screen similar to this:


1. Remove the battery from the phone and slot it back in without booting the phone (If the battery is inbuilt then simply switch if off). Also, ensure theres no SD card in the phone (if theres an SD card slot)
2. Launch SP Flash Tool as Administrator
 | ||
| SP Flash Tool 3. Click on Scatter-loading option & browse to the scatter file of your Stock ROM. (You can find the scatter file with the original stock rom zip file)
|

4. Now, if you want to format your phone, Click Format at the top.
5. Once you are done with everything, click on the download button at the top of the window
 |
| Start flashing 6. Stop should now be prominent while other options should be grayed out 7. Connect the switched off phone (with battery inside) to the PC via USB cord 8. A progress bar should start running 9. Disconnect the phone, remove the battery for 15 seconds (if removable), slot it back in then power up the phone.  Final words As the procedure is bit complex for newbies. However, I have tried to make it as simple as possible. Dont worry! if you are stuck at any point, you can contact us from the below comment form. |
Available link for download
Tuesday, August 30, 2016
Maverick Pro v2 24 Apk Full App Free Dpwnload
Maverick Pro v2 24 Apk Full App Free Dpwnload
Maverick Pro v2.24
Overview: Off-road GPS navigatorwith offline maps support, compass and track recording.

All maps automatically cached for offline use. Use Mobile Atlas Creator to download maps or MAPC2MAPC to convert maps from other formats.
You can send address, GPS coordinates, link to Google Maps and even map image.
Build-in radar shows the direction, distance and estimated time to a point of interest. See all the nearest locations from FourSquare and Footprints.
All waypoint stored in KML file and can be viewed and edited in Google Earth.
Tracks are recorded in GPX format and can be viewed in Google Earth and other software. Share GPX files via email or DropBox.
Free account is required for uploading.
Watch speed, altitude, pitch and many other values.
Basic support for Honeycomb devices.
- No flickering on hi-res tablets.
- Multiple small bugfixes.
- Trackback function.
- Track point information: time, altitude and distance.
- View GPX track in other apps.
- Play GPX track in Google Earth.
- Fixed problems with displaying long tracks.
Support for SQLite atlases
Create any map with Mobile Atlas Creator and copy resulting .sqlitedb file to maverick/maps folder. Just use Big Planet Tracks or RMaps SQLite format.
Atlas can be used with any online map source or the new blank map.
https://play.google.com/store/apps/details?id=com.codesector.maverick.fullAvailable link for download
Huawei E180
Huawei E180
| Huawei E180 WCDMA 3G USB Wireless Modem/ Internet Stick/ Dongle: Descriptions & Features |
Huawei E180 Technical Specification:
| General | |
|---|---|
| Model | E180 |
| Type | 3G USB Modem |
| Networks | 3G / 2G |
| Modem | |
|---|---|
| Chipset | Qualcomm MSM6290 |
| Firmware | 11.126.10.01.68 |
| Algorithm | OLD ALGO |
| Hardware ver. | CD66TCPU |
| Dimensions | |
|---|---|
| Weight | <40 g |
| Height | 80 mm |
| Width | 26 mm |
| Depth | 10 mm |
| Frequency Bands | |
|---|---|
| WCDMA/UMTS | 900 MHz, 2100 MHz |
| GSM/GPRS/EDGE | 850 MHz, 900 MHz, 1800 MHz, 1900 MHz |
| Connectivity Speed | |
|---|---|
| HSDPA | 7.2 Mbps |
| HSUPA | 2 Mbps |
| UMTS | 384 kbps |
| EDGE | 236.8 kbps |
| GPRS | 57.6 kbps |
| Memory Support | |
|---|---|
| Memory Capacity | 8 GB |
| Memory Card Slot | SD Card |
| Additional Features | |
|---|---|
| Setup Installation | Plug and Play |
| Antenna System | Internal |
| LED Indicator | Yes |
| SMS Support | Yes |
| System Requirements | |
|---|---|
| Operating System | Windows XP, Windows Vista, Windows 7 and Mac |
instructions to unlock usb modem for free, unlock Huawei E180 3g usb wireless, free unlocking Huawei E180 dongle, unlock Huawei E180 3g data card, unlock Huawei E180 internet stick, unlock unlock Huawei E180 modem software, desbloquear Huawei E180, deblocage Huawei E180 mobile broadband,
Available link for download
How to Install Android 6 0 1 Marshmallow Tipsy OS 4 1 ROM on Verizon Galaxy S5 SM G900V
How to Install Android 6 0 1 Marshmallow Tipsy OS 4 1 ROM on Verizon Galaxy S5 SM G900V

If you are looking to install a new custom ROM on your Verizon Galaxy S5 SM-G900V then we have here as usual the best Custom ROMs for you.
According to XDA member Blackjubel, Android 6.0.1 Marshmallow Tipsy OS 4.1 ROM is available for Verizon Samsung Galaxy S5 SM- G900V [ kltespr].
You can Find out How to Apply it Right Now via This Easy Tutorial.
÷ Prerequisites:
•This tutorial is only for installing ROM on Verizon Samsung Galaxy S5 SM- G900V [ kltevzw]. Please do not try on any other galaxy S5 variants.
•Your phone should be rooted and haveClockworkMod recovery installed from before.
•This tutorial will wipe out all your data.Proceed at your own risk.Perform a Dalvik Cache wipe before proceeding from the recovery mode.
•Samsung KIES will NOT detect your phone after installing this ROM because it is a custom firmware.
•Make sure you backup all your data in your phone before proceeding.

*Disclaimer:
Android Custom ROM fix ® provide various Firmware Updates and Rooting process along with Custom ROM,Modes,file are all belong to their owners/developers. The autor of this site or the developers are not responsible, if you damage or brick your device.Do it on your own risk and follow the instruction properly.
* Important:
Backup important files stored on your device before proceeding with the steps below, so that in case something goes wrong you’ll have backup of all your important files.
÷ How to Install Android 6.0.1 Marshmallow Tipsy OS 4.1 ROM on Verizon Galaxy S5 SM- G900V.
Step 1 – Download Tipsy OS 4.1 Android 6.0.1 Marshmallow and Google Apps for your Verizon Samsung Galaxy S5 SM- G900V to your computer.
Step 2 – Connect and mount your Galaxy S5 USB memory on your computer using the USB cable.
Step 3 – Now copy/paste the downloaded Android 6.0.1 ROM zip file and Google Appszip files to your SD card. Make sure the files are in the SD card root (not in any folder).
Step 4 – Then turn OFF your phone and disconnect from the USB cable.
Step 5 – Now to get in the Recovery Mode. Switch ON the phone while pressing and holding Volume Up + Home + Power buttons together
Step 6 – Once you are in ClockworkModRecovery, select perform a full data wipe by selecting “wipe data/factory reset”. Use the Power button to select everything while in the Recovery Mode.
Step 7 – Then, perform a cache wipe by selecting “wipe cache partition” .
Step 8 – Now this is optional, but it is recommended to perform a wipe of your dalvik cache as well. You will not get into boot loops or any other errors. From CWM recovery, go to ‘advanced’ and then select “wipe dalvik cache”.
Step 9 – Then go back to the main recovery screen and select “install zip from SD card”.
Step 10 – Now select “choose zip from sdcard”. Using your volume keys, navigate to the Android 6.0.1 ROM zip file that you copied to your SD card and select it using the Power button. Confirm the installation on the next screen and the installation procedure should start now.
Google Apps: Repeat the above step for the Gapps zip file as well and install it on your phone.
Step 11 – After the installation completes, go to “+++++Go Back+++++” and reboot the phone by selecting “reboot system now” from the recovery menu.
Your Verizon Samsung Galaxy S5 SM- G900V will boot now and it might take about 5 minutes to boot on your first time. So, please wait.

That’s it Your Samsung Galaxy S5 SM- G900V should now have Tipsy OS 4.1 Android 6.0.1 Marshmallow latest build installed on your phone! Go to Settings > About phone to verify.
For More Samsung Galaxy S5 Brand New Firmware & Custom ROM keep checking AndroidCustomROM Fix ™®
Like this post? PLZ Hit the share buttons below to share this article with your friends on Facebook, Google + and Twitter.
Want the latest Updates Sign up for our newsletters!
PLZ Follow Us On Flipboard 4 More latest custom ROM fix.
PLZ Use the comment box below to contribute more ideas & Suggestions .
Best Regards.
Available link for download
Lynis Auditar y fortificar servidores GNU Linux
Lynis Auditar y fortificar servidores GNU Linux
 |
| Figura 1: Lynis, audita y fortificar servidores GNU/Linux |
Hoy vamos a hablar de otra herramienta que sirve para auditar sistemas, en este caso fortificar GNU/Linux. La herramienta se denomina Lynis y permite realizar auditoria de seguridad y fortificación de los sistemas basados en Unix. Lynis realiza un escaneo profundo sobre el sistema en el que se lanza, aunque juntándola con SSH podríamos lanzarla de forma sencilla en otros servidores de la organización. El objetivo de Lynis es detectar fallos de seguridad y errores de configuración o debilidades en el propio sistema. Estos resultados se utilizarán para fortificar a posteriori el sistema. El reporte que proporciona la herramienta ayudará a la toma de decisiones que habrá que tomar para la fortificación o hardening de los servidores GNU/Linux.
La herramienta también escanea de forma general el sistema detectando la falta de software actualizado o la existencia de paquetes de software vulnerables y los errores de configuración en la máquina. Lynis es utilizado por el blue team de una empresa, para mejorar las defensas de los servidores. Además, la herramienta proporciona una forma automatizada de auditar el servidor en modo caja blanca, realizar o llevar a cabo test de compliance, cumplimiento de PCI-DSS, HIPAA, etcétera, y detectar vulnerabilidades conocidas y debilidades.
¿Qué es lo que podemos sacar?
Descargarse Lynis es sencillo, podemos bajarlo de Github con la instrucción git clone https://github.com/CISOfy/lynis.git. Tal y como se puede ver en la imagen se obtienen diversos archivos, pero su ejecución es rápida y sencilla ./lynis –help.
 |
| Figura 2: Estructura de ficheros de Lynis |
Lynis ofrece multitud de opciones para ser ejecutado. Una de las que llaman la atención es la posibilidad de auditar un dockerfile, es decir, un contenedor que tiene todas las dependencias de una aplicación en un formato estandarizado. Su ejecución en modo audit es sencilla. Debemos ejecutar la instrucción ./lynis audit system y la herramienta comenzará a realizar diferentes tests. Cada test está implementado en un plugin, los cuales pueden ser enumerados en la carpeta plugins, una vez descargado Lynis versión Enterprise.
 |
| Figura 3: Lanzamiento de auditoría de un servidor |
Por cada tramo de evaluación que hace la herramienta, ésta se detendrá para que podamos evaluar lo que se nos presenta en pantalla. Lanzando Lynis sobre una Kali Linux 2.0 lo primero que se nos proporciona es información sobre el sistema operativo. El uso de los plugins puede ser muy interesante, ya que se añade más información, aunque para ello debamos utilizar la versión Enterprise.
Lynis lanzará pruebas sobre los siguientes elementos y nos irá mostrando por pantalla los resultados parciales que va detectando:
• Boot y servicios.
• Evaluación de la configuración del kernel.
• Comprobación de memoria y procesos.
• Configuración de las políticas de usuarios, grupos y métodos de autenticación.
• Shells.
• Evaluación del sistema de archivos.
• Almacenamiento.
• Ports & Packages.
• Networking.
• Configuración del software: servidor web, SSH, SNMP, motores de base de datos, PHP, configuración del logging de la máquina, etcétera.
• Evaluación de los valores que fortifican el kernel.
• Por último, resultados.
 |
| Figura 4: Resultados de auditoría del kernel de un Kali Linux 2.0 |
En la siguiente imagen vemos cómo se lanza una serie de pruebas sobre los elementos de boot y los servicios y la herramienta nos proporciona rápidamente los resultados. Se detecta, por ejemplo, que el GRUB no está protegido con contraseña, por lo que cualquier usuario con acceso físico a la máquina podría editarlo y conseguir una shell como root de forma sencilla.
 |
| Figura 5: Resultados de auditoría del boot y los servicios |
En la siguiente imagen se puede ver los test que se pasan a la política y configuración de usuarios, grupos y los métodos de autenticación. El color amarillo nos indica qué hay cosas que son mejorables, y serán tomadas en cuenta por Lynis en el reporte final, dónde nos entregarán una puntuación y nos recopilarán todos los fallos que deben ser resueltos.
 |
| Figura 6: Resultados de auditoría de usuarios, grupos y sistemas de autenticación |
Por último, se presentan los resultados y la evaluación mediante un número que indica el nivel de fortificación de la máquina.
 |
| Figura 7: Resumen sumario de la auditoría |
Además, se hace un recopilatorio de los tests realizados y los plugins habilitados. Además, la herramienta nos realiza una serie de sugerencias para mejorar el hardening de la máquina, lo cual es realmente interesante.
 |
| Figura 8: Recomendaciones extras de fortificación |
Lynis es una herramienta muy útil para hacer hardening de los sistemas GNU/Linux y para poder evaluar su nivel de seguridad actual. Cómo mencioné anteriormente, es una herramienta con la que deben contar todos los Blue Teams para poder tomar decisiones con las que se mejore la seguridad de la empresa.
Autor: Pablo González Pérez (@pablogonzalezpe)
Escritor de los libros "Metasploit para Pentesters", "Ethical Hacking" y “Pentesting con Powershell”
Sigue Un informático en el lado del mal - Google+ RSS 0xWord

Available link for download
Hands on review Vorke V1
Hands on review Vorke V1
The flood of small form factor personal computers on the market means that it has become increasingly difficult for vendors to differentiate themselves from their competitors.
This is particularly true given the razor-thin margins they tend to live on, which explains why corners are often cut where possible, and why sometimes some rival models share similar features and chassis.
This is the case for the Vorke V1 and the Pipo X6S. Were checking out the former today, courtesy of Geekbuying, which is selling this mini PC for around £160 (about $210, AU$280), but thats subject to exchange rate fluctuations.
That includes delivery but excludes VAT and potential handling fees, which may add another 25% to the price. The device is not available from eBay or Amazon at the time of writing. Before you commit to any purchase, its well worth checking out our guide to buying tech from online Chinese retailers.
The Vorke V1 is significantly bigger than the Voyo V3 or the Beelink BT7 that we reviewed recently. But there is a good reason for that.
The main appeal of the V1 is that it is easily upgradable. There are just four screws to take out in order to access the entire motherboard (only one if you want to add a 2.5-inch hard disk drive).
The outside of this compact box is as unimpressive as it gets – it has a reflective piano black cover with a big VORKE logo written on top as well as a grey power button the size of a two-pence coin.
You simply cant miss it – the location of the button means that you will have to access the top of the device in order to switch it on or off, unlike most of its competitors.
Vorke provides mounting brackets and screws as well as a power cord with a power supply. Theres a selection of ports on the front (two USB 2.0 ports and a microSD card slot, along with an IR receiver), and at the back of the device, youve got two USB 3.0 ports, an audio socket, VGA, HDMI and a Gigabit Ethernet connector.
On either side of the box are air vents to cool down the CPU with a small heatsink and fan also helping out. Flip the V1 upside down and you will find a circular stand that can be removed by unscrewing one screw – doing so reveals the motherboard and a free SATA connector that can accommodate a hard disk drive or an SSD, as we mentioned before.
You will have to remove a few more screws to access the rest of the components. Those comprise of a single ADATA 4GB DDR3L memory module (upgradable to 8GB), an Intel Wireless LAN card supporting 802.11ac Wi-Fi and Bluetooth 4.0, and a 64GB Foresee mSATA SSD (to which you can add another 2TB hard drive).
The processor used by the V1 is a Braswell-based model, an Intel Celeron J3160 which looks a lot like the Atom x7-Z8700 from last year but with a slightly lower turbo frequency (2.24GHz compared to 2.4GHz).
Both these processors have four cores and handle four threads, are fabbed using a 14nm process, have 2MB L2 cache and a base frequency of 1.6GHz.
The J3160 supports dual memory channel but the V1 has only one memory slot. Another difference between the two models is the integrated graphics (Intel HD Graphics 400 versus Intel HD Graphics).
The former has a higher base frequency (320MHz compared to 200MHz) but a lower execution units (EU) count of 12 rather than 16.
On paper, both should perform equally well on light tasks, the type of workload youd find in a SoHo/SMB environment or a thin client scenario.
The V1 runs Windows 10 Home 64-bit – which you can upgrade to Windows 10 Pro – and you should be able to install Ubuntu on it.
In use, we didnt experience anything out of the ordinary bar the noise of the fan; using Google Chrome, playing some YouTube videos and some light in-browser gaming were all performed without hiccups.
One missing feature that might be a deal-breaker for some is the absence of holes for VESA brackets – so you wont be able to hang the V1 on the back of a TV or monitor.
Early verdict
This is perhaps the best mini PC weve come across for SMBs. The fact that it has a VGA port and allows for upgrades means that you can connect it to a legacy monitor.
System admins will also appreciate the Gigabit wired connectivity option as well as the SATA port connector, the 802.11ac Wi-Fi and the Windows 10 license.
The ability to run Ubuntu is also commendable although unless youre a Linux aficionado or anti-Microsoft, wed fail to see why one would get rid of the existing Windows 10 installation.
The competition is composed mainly of the Voyo V3, the Nexbox T9, the Pipo X6S and the K6A. All of them are cheaper but other than the V3, the rest use the slower Intel Atom Z8300 CPU.
The real threat to this device, though, comes from laptops – not barebones. A laptop with a touchscreen display and a 500GB hard disk drive costs around £220 (around $290, AU$380) in the UK.
Sure, it may not come with the expansion capabilities of this mini PC, but it is an infinitely more flexible option, especially if youre a business and dont want to worry about the hassle of aftersales.
- 5 reasons why your next business PC should be a small PC
from TechRadar: Technology reviews http://ift.tt/29JKZvP
Available link for download
Monday, August 29, 2016
How to Share Internet Connection Mobile Partner WiFi Hotspot
How to Share Internet Connection Mobile Partner WiFi Hotspot
Huawei Technologies Co., Ltd .. sells routers 3G / 4G mobile high performance, these WiFi Hotspot offer many advantages in terms of connection speed and their use is ideal when moving. You can share your Internet connection with multiple devices equipped with Wi-Fi device (iPad, iPhone, iTouch, Playstation III, tablet, smartphone, Xbox 360).


Wireless Device
Available link for download
How to Install Android 6 0 1 Marshmallow PhoeniX ROM on Galaxy S5 LTE G900F
How to Install Android 6 0 1 Marshmallow PhoeniX ROM on Galaxy S5 LTE G900F

You Can Find out How to apply it Right Now via this Easy Tutorial.
÷ Prerequisites:
•This tutorial is only for installing PhoeniX Android 6.0.1 ROM on Samsung Galaxy S5 G900F. Please do not try on any other Galaxy S5 variants.
•Your phone should be rooted and have ClockworkMod recovery installed from before.
•This tutorial will wipe out all your data. Proceed at your own risk.
•Perform a Dalvik Cache wipe before proceeding from the recovery mode.
•Samsung KIES will NOT detect your phone after installing this ROM because it is a custom firmware.
•Make sure you backup all your data in your phone before proceeding.
*Disclaimer:
Android Custom ROM fix ® provide various Firmware Updates and Rooting process along with Custom ROM,Modes,file are all belong to their owners/developers. The autor of this site or the developers are not responsible, if you damage or brick your device.Do it on your own risk and follow the instruction properly.
* Important:
Backup important files stored on your device before proceeding with the steps below, so that in case something goes wrong you’ll have backup of all your important files.

÷ How to Install Android 6.0.1 Marshmallow PhoeniX ROM on Galaxy S5 LTE G900F :
Step 1 – Download PhoeniX Android 6.0.1 ROM for Galaxy S5 to your computer.
Step 2 – Connect and mount your Galaxy S5 USB memory on your computer using the USB cable.
Step 3 – Now copy/paste the downloaded Android 6.0.1 ROM zip file to your SD card. Make sure the file is in the SD card root (not in any folder).
Step 4 – Then turn OFF your phone and disconnect from the USB cable.
Step 5 – Now to get in the Recovery Mode. Switch ON the phone while pressing and holding Volume Up + Home + Power buttons together.
Step 6 – Once you are in ClockworkMod Recovery, select perform a full data wipe by selecting “wipe data/factory reset". Use the Power button to select everything while in the Recovery Mode.
Step 7 – Then, perform a cache wipe by selecting “wipe cache partition” .
Step 8 – Now this is optional, but it is recommended to perform a wipe of your dalvik cache as well. You will not get into boot loops or any other errors. From CWM recovery, go to ‘advanced’ and then select “wipe dalvik cache”.
Step 9 – Then go back to the main recovery screen and select “install zip from SD card”.
Step 10 – Now select “choose zip from sdcard”. Using your volume keys, navigate to the Android 6.0.1 ROM zip file that you copied to your SD card and select it using the Power button. Confirm the installation on the next screen and the installation procedure should start now.
Step 11 – After the installation completes, go to “+++++Go Back+++++” and reboot the phone by selecting “reboot system now” from the recovery menu.

Your Galaxy S5 G900F will boot now and it might take about 5 minutes to boot on your first time. So, please wait.
That’s it! Your Galaxy S5 should now have PhoeniX Android 6.0.1 Marshmallow custom ROM installed on your phone! Go to Settings > About phone to verify.
For More Galaxy S5 Updates Keep Checking Android Custom ROM Fix ™®
That’s all. We hope this guide serves you well. If there’s anything you’d like to be added/changed on this page, PLZ Use the comment box below to contribute more ideas & Suggestions .
Like this post? PLZ Hit the share buttons below to share this article with your friends on Facebook, Google + and Twitter.
Want the latest Updates Sign up for our newsletters!
PLZ Follow Us On Flipboard 4 More Latest Updates.
Best Regards.™
Available link for download
HTC Desire 601 Virgin Mobile Stock ROM Firmware Flash File Download Free
HTC Desire 601 Virgin Mobile Stock ROM Firmware Flash File Download Free

Available link for download
Sunday, August 28, 2016
Moto Z Review A Smartphone Like No Other
Moto Z Review A Smartphone Like No Other
With an aluminum frame barely 5mm thick and slap-on "mods" that give it crazy capabilities, the Moto Z is unlike any smartphone you can buy today. Its also the latest installment in one of the most inconsistent product families in mobile technology.
In 2013, Motorola introduced a small, modest mobile that tried to redefine what a smartphone should be, and it called it the "Moto X." The next two years would see the company gradually abandon most of the principles it laid down with that first phone, making the X bigger and brawnier to better battle the Galaxy-class competition from Samsung.
For 2016, Motorola (now a Lenovo sub-brand called simply "Moto") has taken its flagship smartphone so far afield of its origins that it isnt even an "X" anymore. The result is a smartphone that I like very much – one Ill probably buy when the unlocked edition arrives in the fall – but one Im not sure Id recommend to many people. Join me for the Moto Z Droid Edition review by MrMobile!
About this review
MrMobiles Moto Z Review was based on six days trial of a Moto Z Droid Edition review device on loan from Motorola/Verizon Wireless. The Moto Z Droid Edition was not paired to a wearable for this review. Test areas included the North Fork of Long Island, New York; Amtraks CT/NH/MA Northeast Corridor; and Greater Boston, Massachusetts.
Socialize!
- YouTube
- Le web
- Snapchat
from Android Central - Android Forums, News, Reviews, Help and Android Wallpapers http://ift.tt/2aefSe3
via IFTTT
Available link for download
How do I unlock bootloader rooted sm 217s
How do I unlock bootloader rooted sm 217s
I would like to put a custom rom on my tablet. A custom recovery is a necessary step from what I understand. So many tutorials including the one at TWRPs website themselves dont mention that you need to have an unlocked bootloader first. I have tried the TWRP Manager app and it says that I need an unlocked bootloader before I can flash a recovery.
How do I unlock the bootloader? I can not seem to find a tutorial or even any discussion of it in the Galaxy Tab 3 section here and I have spent many hours today trying to figure it out.
I stumbled upon the app Flashfire. It seems promising. It it what I need?
from xda-developers http://ift.tt/2alMrs4
via IFTTT
Available link for download
Montar un escenario de Hacking IPv6 por 2 €
Montar un escenario de Hacking IPv6 por 2 €
 |
| Figura 1: Montar un escenario de hacking IPv6 por 2 € |
- Hacking en redes de datos IPv6: Conceptos básicos IPv6 (1)
- Hacking en redes de datos IPv6: Conceptos básicos IPv6 (2)
- Hacking en redes de datos IPv6: Hackeado en IPv6 por creer que no lo usas
- Hacking en redes de datos IPv6: Ataque de Neighbor Spoofing
- Hacking en redes de datos IPv6: Captura de SMB con Neighbor Spoofing
- Hacking en redes de datos IPv6: FC00::1 (Algunos) Ataques en redes IPv6
- Hacking en redes de datos IPv6: Man in the middle en redes IPv4 usando IPv6
- Hacking en redes de datos IPv6: Desactivar IPv6 para evitar D.O.S. SLAAC
- Hacking en redes de datos IPv6: Predecir direcciones IPv6 Local-Link de OS X
- Hacking en redes de datos IPv6: Ataques en redes de datos IPv4 e IPv6
- Hacking en redes de datos IPv6: Evil FOCA: Ataque SLAAC
- Hacking en redes de datos IPv6: Evil FOCA: Bridging HTTP(IPv6)-HTTPs(IPv4)
- Hacking en redes de datos IPv6: Pasar de IPv4 a IPv6 con una respuesta DNS
- Hacking en redes de datos IPv6: Cómo activar IPv6 en Google Chrome
- Hacking en redes de datos IPv4: Ataque DHCP ACK Injector
- Evil FOCA liberada bajo licencia Open Source
- Hacking en redes de datos IPv6: Topera - Scanner de puertos sobre IPv6
- Implementación de Iddle Port Scanning con IPv6
- Detección de IPv6 en Internet: Cada vez hay más sitios
- Detección de Happy Eyeballs en la red
- Ataque ICMPv6 Redirect: man in the middle a Android, OS X & iPhone
- Implementación de ataques "Delorean" a HSTS
Sigue Un informático en el lado del mal - Google+ RSS 0xWord
Available link for download
How to Update Sony XPERIA M5 E5603 to Android 6 0 Marshmallow Firmware 30 2 A 0 100
How to Update Sony XPERIA M5 E5603 to Android 6 0 Marshmallow Firmware 30 2 A 0 100
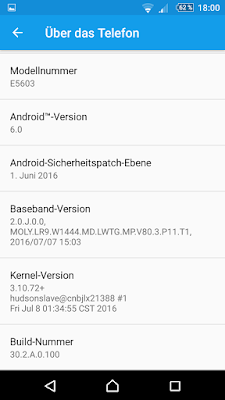
Sony Mobile is currently seeding Android Marshmallow firmware for the Xperia M5, in the form of build number 30.2.A.0.100. This follows on from the Android 6.0.1 Marshmallow release for the Xperia M4 Aqua earlier today.

So far the latest build has only arrived on the E5603 Xperia M5 variant, but we expect it to hit all variants, including the Xperia M5 Dual shortly. We will upload the FTF firmware files shortly, but do let us know your impressions in the meantime.
Don’t worry we are going to share step by step guide to safely update your Xperia M5 to Android 6.0 firmware 30.2.A.0.100.
÷ Prerequisites:
This Tutorial is only for Sony Xperia M5 E5603 variant.
*Disclaimer:
Android Custom ROM fix ® provide various Firmware Updates and Rooting process along with Custom ROM,Modes,file are all belong to their owners/developers. The autor of this site or the developers are not responsible, if you damage or brick your device.Do it on your own risk and follow the instruction properly.
* Important:
Backup important files stored on your device before proceeding with the steps below, so that in case something goes wrong you’ll have backup of all your important files.
÷ How to Update Sony XPERIA M5 E5603 to Android 6.0 firmware 30.2.A.0.100
1- check your firmware version (if you already have the newest one, you do not need this tutorial)
2- Download and install latest Flashtool .
3- Download also latest Android 6.0 Marshmallow Firmware 30.2.A.0.100 for Sony XPERIA M5.
4- Paste the ftf file downloaded in step c) to folder „Firmware“ included in the XPERIA Flashtool.
5- Open the XPERIA Flashtool, click on flash and choose downloaded firmware, than click ok. Important - if you do not want to delete any data of your phone, just uncheck flashing userdata.sin file. All data will remain in your phone, but sometimes it can cause additional troubles. So it is better (and I recommend that) to do the backup of your personal data, than proceed with clean instalation and then restore your personal data.
6- Turn off your phone and when Flashtool shows pop up window, connect phone to PC with holding volume down button and than allow FSC (must)
7- After few minutes all is done and your phone gets the new firmware.
That’s it! Your XPERIA M5 should now have Marshmallow 6.0 firmware 30.2.A.0.100 on your phone! Go to Settings > About phone to verify.
For More Sony Xperia M5 Update Keep Checking Android Custom ROM Fix ™®
That’s all. We hope this guide serves you well. If there’s anything you’d like to be added/changed on this page, PLZ Use the comment box below to contribute more ideas & Suggestions .
Like this post? PLZ Hit the share buttons below to share this article with your friends on Facebook, Google + and Twitter.
Want the latest Updates Sign up for our newsletters!
PLZ Follow Us On Flipboard 4 More Latest Updates.
Best Regards.™
Available link for download